When developing orchestration between integrated endpoints, developers can face a difficult hurdle right out of the gate: authentication workflows. Integrating with endpoints that use disparate authentication methods makes for much more work—building complex code logic for determining and executing workflows themselves, adding a branded UI, and more. Using standardized authentication, you can save substantial development time and resources while providing users with a standardized OAuth authentication experience for every element, regardless of its native authentication workflow.
Simply put, the standardized authentication service leverages Cloud Elements' normalized authentication APIs for each element and provides you with:
- A single API to initiate the authentication process
- A generated UI to present to your end-users in an iframe, pop-up, or new tab
- Automatic provisioning of a Cloud Elements instance
- Notification of the resulting element instance creation
How it Works
Standardized authentication makes it simple to connect with multiple elements that each use different authentication workflows. For example, imagine you're building an integration using elements for a CRM, a finance platform, and a document signing service. You would need to authenticate with each endpoint using its own individual authentication method, meaning lots of development work, as well as continued maintenance in case of any changes or updates on the endpoint's side. But by standardizing the authentication process for every supported element in our catalog, you can quickly and easily give your users a normalized authentication experience.
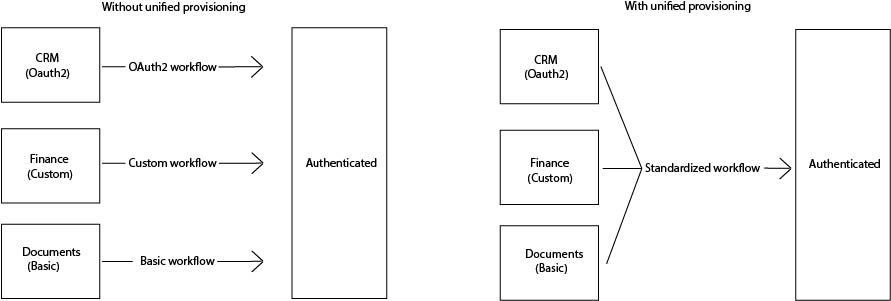
In addition to standardizing the authentication workflows themselves on the backend, this also standardizes the user experiences on the frontend. This keeps you from needing to build element-specific UIs for each authentication type while making the experience consistent and seamless across all auth types.
Who Can Use It
All Cloud Elements users can use standardized authentication, and no manual work is required to access the functionality.
Using Standardized Authentication with Custom Elements
Every element in our Elements Catalog, as well as any custom user-built elements; no additional work is needed for elements built using Element Builder.
Getting Started with Standardized Authentication
In this section, you'll learn how to implement standardized authentication and provision element instances. These processes can be repeated for any elements in the catalog. All standardized authentication setup steps in this document are completed via API; see the detailed API documentation for more information, view the Postman collection, or see a sample application on Cloud Elements Open Labs.
We'll call APIs to perform these tasks:
- Create an authentication application
- Add elements to the application
- Create a session for the app
- Customize branding
Creating an Authentication Application
Before using standardized authentication to create instances, you need to create an application with which the elements will be authenticated and the instances created. You can also have multiple applications, each with their own customization.
To create an authentication application, complete these steps:
Note: in this example, replace <environmentURL> with your environment's endpoint; see the Environment URL Appendix below for details.
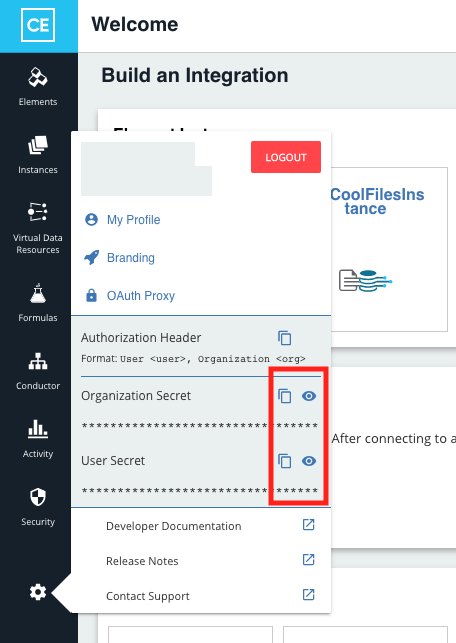
Retrieve your organization and user tokens, which you will need in order to begin. You can find them by navigating to your Cloud Elements environment, clicking the Settings button, and either viewing or copying them. You can also click the Copy icon in the Authorization Header to capture your organization and user secrets in authorization header format.
Call
POST https://<environmentURL>/v1/elements/normalized-instances/applications. Include the following in the body of your call:

{
    "description": "{INSERT_APPLICATION_DESCRIPTION}",
    "name": "{INSERT_APPLICATION_NAME}",
    "notificationCallback": {
        "url": "{INSERT_NOTIFICATION_URL}"
    }
}- You can include an optional callback URL to receive notifications on a successful or failed instance creation. See Configuring Notifications for more details.
- Make sure to include the authorization header using your organization and user secrets; see the Postman collection for examples and additional parameters.
- Note the
applicationIDvalue in the successful response; you will use it to add elements to your application in the next step.
Adding Elements to the Application
Once you've created your application, add the elements you want to use. You can always add additional elements in the future.
To add elements to the application, complete these steps:
Call
POST https://<environmentURL>/v1/elements/normalized-instances/applications/<APP_ID>/element-specific-configswhere<APP_ID>is theapplicationIDvalue you recorded earlier.Include the following in the body of your call:
{
    "elementKey": "INSERT_ELEMENT_KEY",
    "configs" : {
	"INSERT_REQUIRED_CONFIG_1": "configValue",
	"INSERT_REQUIRED_CONFIG_2": "configValue",
	"INSERT_REQUIRED_CONFIG_3": "configValue"
	}
}
In the Configs section of the body, add any of the element's required configuration parameters and their values. Include any credentials you want to associate with the element you're adding; see the Setup section of an element's metadata to see what parameters are available. If you do not define a callback URL on the element-specific-config of the application, it will default to
<baseURL>/callback; see the Base URL appendix below for details.Repeat the above for however and whatever elements you want to add to your application.
Creating a Session for the Application
Every potential instance provisioning starts by creating a session against the application identifier and a given element key. The /session call generates the auth screens for the end-user and gets the auth flow started. Make this call from any button in your product.
To create a session, complete these steps:
Call
POST https://<environmentURL>/v1/elements/normalized-instances/applications/<APP_ID>/sessions?elementKey=<INSERT_ELEMENT_KEY>A successful response includes both the redirectUrl and its expiration date/time:
{ "redirectUrl": "https://provisioning.snapshot.us.cloudelements.io/oauth?sessionID=id62g623-af4a-4986-s572-58e2d422b505", "expiration": "2021-01-04T08:36:49Z" }- Redirect the user to the redirectUrl value.
Once the user is directed to the redirect URL, Cloud Elements guides the user through the correct authentication flow. - Once the instances are provisioned, a notification with all instance details is sent to the callback URL, if provided when you created the application.
- Persist the instance token to the respective user within your product. You can now use this as the Element token for any element API call through Cloud Elements.
Configuring Notifications
Standardized authentication's notifications support both webhooks and polling. If your application can accommodate webhooks, we recommend using them; otherwise, polling will work with any application.
- For polling, call the
GET /sessions/{sessionID}/statusendpoint. In the response, the status will indicate whether or not the instantiation is successful or failed; otherwise, it will returnpendingif the instantiation is still in progress. - For additional security in webhook notifications, you can include the
signatureKeyconfiguration parameter in thenotificationCallbackobject on the application request payload; this should be a 32-key AES key (any 32 characters will do) that is both base64-encoded without padding. Whenever the key is included, the following headers are included on each notification:
Signature-Key-Hash(SHA-256 of the encryption key)
Signature-Id(nonce that serves as the unencrypted version of the signature)
Signature(Signature-Id AES 256 encrypted with the user provided key)
Notifications are sent for either failed instantiation or successful instantiation; examples of both are included below:
Success Notification Example
{
  "status": "success",
  "elementInstance": {
    "id": 1234455357,
    "name": "2021-03-16T19:14:23.489Z",
    "token": "XXXXXXXXXXXXXXXXXXX",
    "valid": true,
    "disabled": false,
    "configuration": {...},
    "eventsEnabled": false,
    "createdDate": "2021-03-16T19:14:24Z",
    "updatedDate": "",
    "element": {
      "id": 12345,
      "name": "httpbin",
      "key": "httpbin",
      "description": "Httpbin",
      "image": "elements/custom-element-default-logo.png",
      "logo": "httpbin",
      "active": true,
      "deleted": false
    }
  },
  "sessionID": "890113df-32d7-44e3-9909-1eaada7bd2d6"
}
Failure Notification Example
{
  "status": "failed",
  "message": "Error in Provisioning Element Instance",
  "debug_id": "8810937648296322661",
  "sessionID": "67233e58-e842-46c3-9e21-09d2e35861b4"
}
Customizing the Application's Branding
Cloud Elements automatically generates a login UI including required authentication fields for your application's end users. However, you can also customize the login UI's appearance to visually match your brand identity's typography, color scheme, logos, and even relevant links (eg links to privacy statements, documentation, etc). Note that new styles and branding configurations only apply after creating a new session.
You can customize branding using either via the branding UI or the branding API. To access the branding UI, navigate to https://<baseURL>/branding (see Base URL Appendix below for relevant base URLs).
To customize the application branding via API, complete these steps:
- Retrieve your current branding by calling
GET https://<environmentURL>/v1/elements/normalized-instances/applications/<APP_ID>/, where <APP_ID> is theapplicationIDvalue you recorded and used earlier. - After receiving a successful response, copy and paste the
Brandingarrays from the response payload. CallPUT https://<environmentURL>/v1/elements/normalized-instances/applications/<APP_ID>/branding, including in the body whatever updated branding parameters you wish to apply.
Environment URL Appendix
| Environment URL | Description |
|---|---|
https://snapshot.cloud-elements.com/ | US Snapshot |
https://staging.cloud-elements.com/ | US Staging |
https://api.cloud-elements.com/ | US Production |
https://api.cloud-elements.co.uk/ | EU Production |
https://api.apac.cloudelements.io/ | APAC Production |
Base URL Appendix
| Base URL | Description |
|---|---|
https://provisioning.snapshot.us.cloudelements.io/ | US Snapshot |
https://provisioning.staging.us.cloudelements.io/ | US Staging |
https://provisioning.us.cloudelements.io/ | US Production |
https://provisioning.eu.cloudelements.io/ | EU Production |
https://provisioning.apac.cloudelements.io/ | APAC Production |
