Before using an OAuth proxy with Cloud Elements, you must have the necessary information for your application, including the API key and API secret. You can access that information from the application provider's site.
Creating an OAuth Proxy via the UI
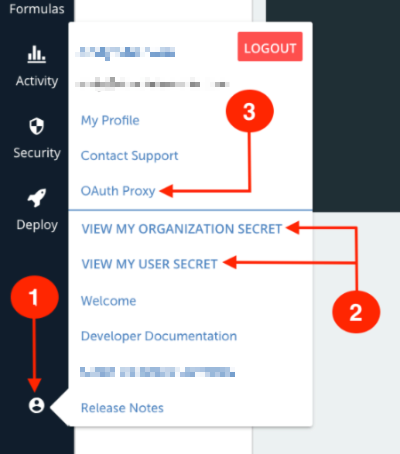
- Sign in to your Cloud Elements account, and click the Account Profile button.
- Click VIEW MY ORGANIZATION SECRET and VIEW MY USER SECRET. Take note of your Organization and User secrets, as they will be used later in this setup process.
- Click OAuth Proxy.
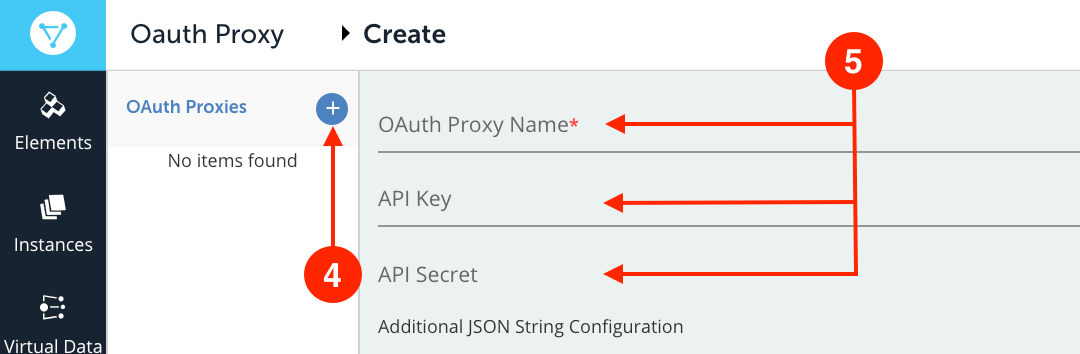
- At the top of the OAuth Proxies list, click the Add button.
- On the Create page, enter the following information:
- OAuth Proxy Name
- API Key
- API Secret
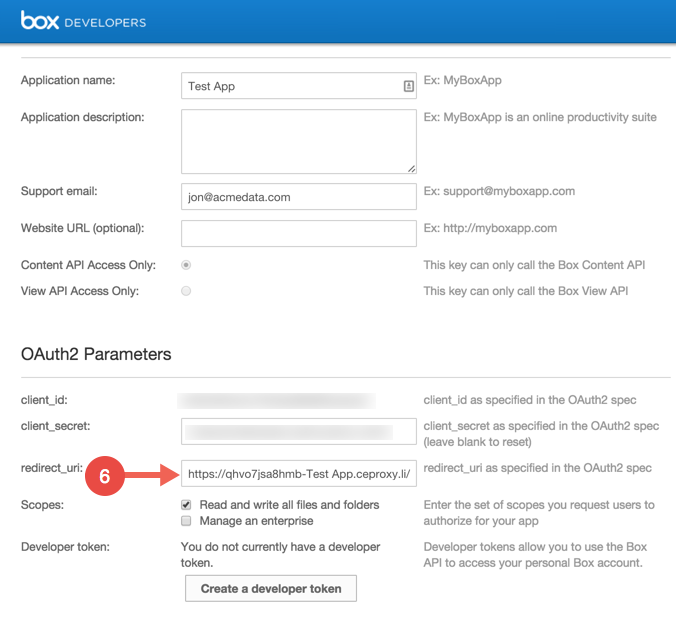
- Paste the unique URL generated by Cloud Elements in the Redirect URL field of the application provider's site. For this example, we will use Box.
- Execute the cURL GET command:
curl -X GET \
	 'https://api.cloud-elements.com/elements/api-v2/elements/<Element name here>/oauth/url?isOauthProxy=true&oauthProxyName=%3CYour%20OAuth%20Proxy%20Name%3E&apiKey=%3CAPI%20Key%3E&apiSecret=%3CAPI%20Secret%3E&callbackUrl=%3CUnique%20UL%20Cloud%20Elements%20generated%3E&state=%3CURL%20you%20want%20the%20proxy%20to%20point%20to%3E&callbackProxy=true' \
	 -H 'Authorization: User <secret>, Organization <secret>' \
	 -H 'Cache-Control: no-cache' \
	 -H 'Content-Type: application/json'
The above should either give you a code or have you run through the OAuth flow which will render a code to you. Record that code.
- Execute the cURL POST command:
curl -X POST \ https://api.cloud-elements.com/elements/api-v2/instances \ -H 'Authorization: User <Secret>, Organization <sceret>' \ -H 'Cache-Control: no-cache' \ -H 'Content-Type: application/json' \ -d '{ "element": { "key": "<Name of Element>" }, "providerData": { "code": "<Code from the GET flow>" }, "configuration": { "authentication.type": "oauth2", "oauth.api.key": "<Your API Key>", "oauth.api.secret": "<Your API Secret>", "oauth.callback.url": "<The OAuth Proxy URL Cloud Elements generated>" }, "name": "<Your name for the instance>" }' - After executing the cURL GET command, you should either receive a code or be run through the OAuth flow, generating the code. Take note of the code.
- Execute the following API call:
curl -X POST \
	 https://api.cloud-elements.com/elements/api-v2/instances \
	 -H 'Authorization: User <Secret>, Organization <sceret>' \
	 -H 'Cache-Control: no-cache' \
	 -H 'Content-Type: application/json' \
	 -d '{
	 "element": {
	 "key": "<Name of Element>"
	 },
	 "providerData": {
	 "code": "<Code from the GET flow>"
	 },
	 "configuration": {
	 "authentication.type": "oauth2",
	 "oauth.api.key": "<Your API Key>",
	 "oauth.api.secret": "<Your API Secret>",
	 "oauth.callback.url": "<The OAuth Proxy URL Cloud Elements generated>"
	 },
	 "name": "<Your name for the instance>"
	}'


You should receive a 200 response code and a brand new instance of your element.
The "configuration" JSON object may have to be slightly modified depending on the element you are using. Refer to the authentication tab for the given element in the Element Catalog.
Creating an OAuth proxy via API
Execute the following API call:
curl -X POST \
	  https://api.cloud-elements.com/elements/api-v2/elements/oauthProxies \
	  -H 'Authorization: User <<user_token>>, Organization <<organization_token>>' \
	  -H 'Content-Type: application/json' \
	  -d '{
	  "name":"Your OAuth Proxy Name",
	  "apiKey":"<<yourApiKey>>",
	  "apiSecret":"<<yourApiSecret>>",
	   "configuration":"{ \"config\": \"additional\" }"
	}'
The answer for the above call should be:
200 OK:

	{
	    "apiKey": "<<yourApiKey>>",
	    "configuration": "{ \"config\": \"additional\" }",
	    "proxyUrl": "https://XXXXXXXX-YourOAuthProxyName.ceproxy.co.uk/production",
	    "name": "Your OAuth Proxy Name",
	    "apiSecret": "<<yourApiSecret>>",
	    "id": <<oauthProxyUrlId>>
	}
Enter the OAuth Proxy URL in the Redirect URL section of your application provider's site.

