Before using an OAuth proxy with Cloud Elements, you must have the necessary information for your application, including the API key and API secret. You can access that information from the application provider's site.
Creating an OAuth Proxy via the UI
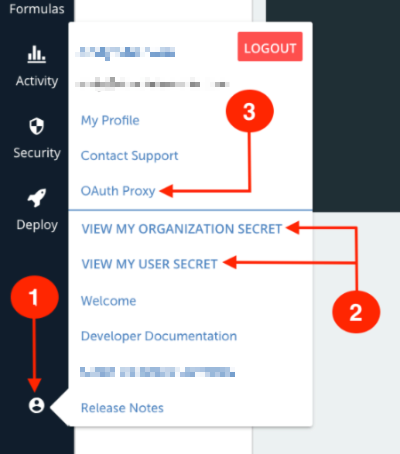
- Sign in to your Cloud Elements account, and click the Account Profile button.
- Click VIEW MY ORGANIZATION SECRET and VIEW MY USER SECRET. Take note of your Organization and User secrets, as they will be used later in this setup process.
- Click OAuth Proxy.
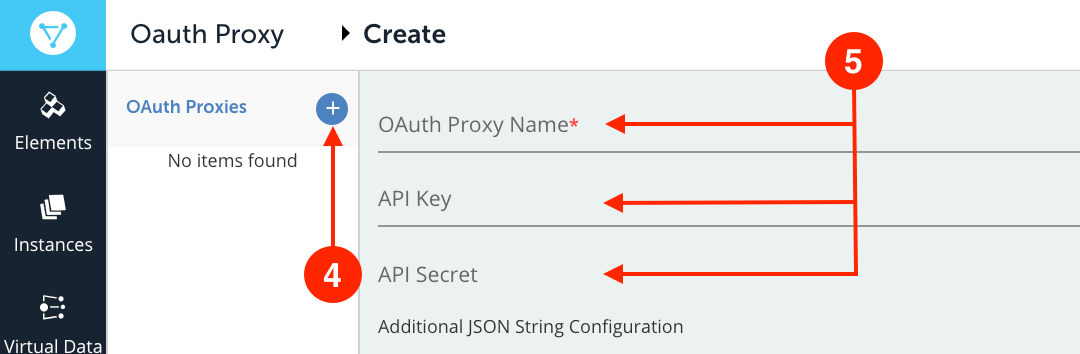
- At the top of the OAuth Proxies list, click the Add button.
- On the Create page, enter the following information:
- OAuth Proxy Name
- API Key
- API Secret
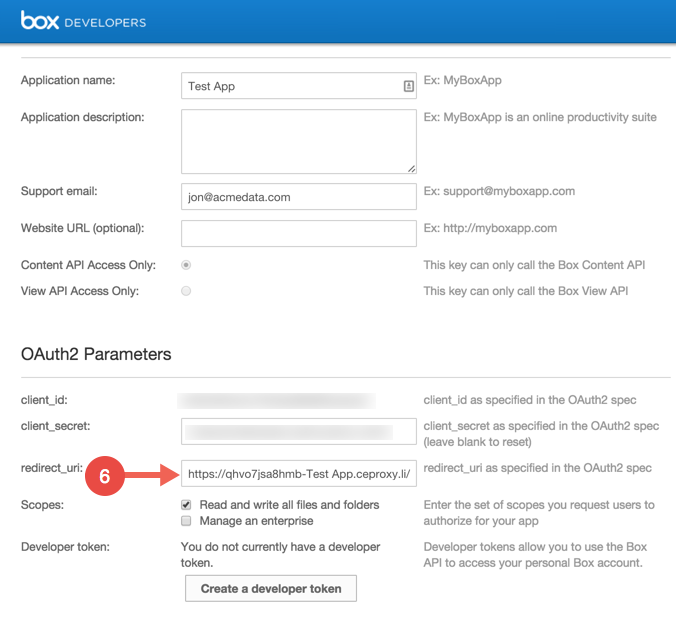
- Paste the unique URL generated by Cloud Elements in the Redirect URL field of the application provider's site. For this example, we will use Box.
- Execute the cURL GET command:
curl -X GET \
	 'https://api.cloud-elements.com/elements/api-v2/elements/<Element name here>/oauth/url?isOauthProxy=true&oauthProxyName=%3CYour%20OAuth%20Proxy%20Name%3E&apiKey=%3CAPI%20Key%3E&apiSecret=%3CAPI%20Secret%3E&callbackUrl=%3CUnique%20UL%20Cloud%20Elements%20generated%3E&state=%3CURL%20you%20want%20the%20proxy%20to%20point%20to%3E&callbackProxy=true' \
	 -H 'Authorization: User <secret>, Organization <secret>' \
	 -H 'Cache-Control: no-cache' \
	 -H 'Content-Type: application/json'
The above should either give you a code or have you run through the OAuth flow which will render a code to you. Record that code.
- Execute the cURL POST command:
curl -X POST \ https://api.cloud-elements.com/elements/api-v2/instances \ -H 'Authorization: User <Secret>, Organization <sceret>' \ -H 'Cache-Control: no-cache' \ -H 'Content-Type: application/json' \ -d '{ "element": { "key": "<Name of Element>" }, "providerData": { "code": "<Code from the GET flow>" }, "configuration": { "authentication.type": "oauth2", "oauth.api.key": "<Your API Key>", "oauth.api.secret": "<Your API Secret>", "oauth.callback.url": "<The OAuth Proxy URL Cloud Elements generated>" }, "name": "<Your name for the instance>" }' - After executing the cURL GET command, you should either receive a code or be run through the OAuth flow, generating the code. Take note of the code.
- Execute the following API call:
curl -X POST \
	 https://api.cloud-elements.com/elements/api-v2/instances \
	 -H 'Authorization: User <Secret>, Organization <sceret>' \
	 -H 'Cache-Control: no-cache' \
	 -H 'Content-Type: application/json' \
	 -d '{
	 "element": {
	 "key": "<Name of Element>"
	 },
	 "providerData": {
	 "code": "<Code from the GET flow>"
	 },
	 "configuration": {
	 "authentication.type": "oauth2",
	 "oauth.api.key": "<Your API Key>",
	 "oauth.api.secret": "<Your API Secret>",
	 "oauth.callback.url": "<The OAuth Proxy URL Cloud Elements generated>"
	 },
	 "name": "<Your name for the instance>"
	}'


You should receive a 200 response code and a brand new instance of your element.
The "configuration" JSON object may have to be slightly modified depending on the element you are using. Refer to the authentication tab for the given element in the Element Catalog.
Creating an OAuth proxy via API
Execute the following API call:
curl -X POST \
	  https://api.cloud-elements.com/elements/api-v2/elements/oauthProxies \
	  -H 'Authorization: User <<user_token>>, Organization <<organization_token>>' \
	  -H 'Content-Type: application/json' \
	  -d '{
	  "name":"Your OAuth Proxy Name",
	  "apiKey":"<<yourApiKey>>",
	  "apiSecret":"<<yourApiSecret>>",
	   "configuration":"{ \"config\": \"additional\" }"
	}'
The answer for the above call should be:
200 OK:

	{
	    "apiKey": "<<yourApiKey>>",
	    "configuration": "{ \"config\": \"additional\" }",
	    "proxyUrl": "https://XXXXXXXX-YourOAuthProxyName.ceproxy.co.uk/production",
	    "name": "Your OAuth Proxy Name",
	    "apiSecret": "<<yourApiSecret>>",
	    "id": <<oauthProxyUrlId>>
	}
Enter the OAuth Proxy URL in the Redirect URL section of your application provider's site.

![]() The OAuth Proxy feature provided by Cloud Elements offers the possibility to connect multiple environments using only one callback URL (the one provided by Cloud Elements). In some cases, the application can support only one callback URL, thus limiting the developer’s possibilities.
The OAuth Proxy feature provided by Cloud Elements offers the possibility to connect multiple environments using only one callback URL (the one provided by Cloud Elements). In some cases, the application can support only one callback URL, thus limiting the developer’s possibilities.
This feature can enable multiple domain connections possibilities. As each application domain can differ, and to ensure a successful connection through the provided callback URL, the application field should contain only valid regex regular expressions.
Regex regular expressions represents a sequence of characters that define a search pattern. They are a way to describe patterns in a string data and they form a small separate language (it is part of JavaScript but also from many other programming language). When used in JavaScript these regular expressions are also objects. They can provide compilation of the regular expression when the script is loaded. For example, if a company owns the domain named《 *justATest.com 》, this one has to be adjusted to the regex regular expressions into this way: 《 .*\.justATest\.com 》.
If the chosen application URL does not fulfill the regex regular expression rules no connection can be established to the desired application. The error can be displayed in two different ways, depending the connection method:
If you are connected in your application UI and want to see from a user’s perspective how the connection is performed, instead of being redirected to the application connection page where you can type in your credentials, a blank page will be displayed in your browser with the message “This site can’t be reached… ERR_TIMED_OUT”;
If you’re trying to connect via Postman or any other tool that supports every stage of the API Lifecycle, the following error message will be displayed “Failed to retrieve OAuth authorize url”.
Here is an example of an invalid regular expression case:
Create an OAuth Proxy and add an invalid regular expression:

Check the application connection through Postman:

The above error appears due to an invalid regex expression used in the callback URL provided within the OAuth Proxy Application URL:
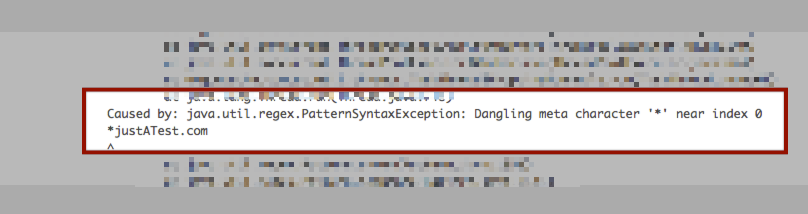
The previous error from steps 2 and 3 can be avoided if the domain URL is adjusted to the regex regular expressions using this 《 .*\.justATest\.com 》instead of this 《
*justATest.com》.

