Cloud Elements currently supports events via polling or webhooks depending on the endpoint.
- Polling is a mechanism where Cloud Elements executes the configured query every
nminutes and captures the changed information. - Webhooks are when the provider lets Cloud Elements know what information has changed. Note that additional endpoint setup may be required prior to creating your element instance.
If you would like to see more information on our Events framework, please see Events Overview.
Webhooks
Slack requires an extra specification to be entered once an element instance has been created. The Slack Instance ID must be base 64 encoded, then included in the webhook callback URL. This document will walk you through the entire workflow:
- Get element Oauth Information
- Creating an instance
- Webhook setup
Step 1. Get Elements OAuth Information
- HTTP Header: None
- HTTP Verb: GET
- Request URL: /elements/{keyOrId}/oauth/url
- Request Body: None
Query Parameters:
apiKey– the key obtained from registering your app with the provider
apiSecret – the secret obtained from registering your app with the provider
callbackUrl – the URL that you supplied to the provider when registering your app, state – any custom value that you want passed to the callback handler listening at the provided callback URL.
The result of this API invocation is an OAuth redirect URL from the endpoint. Your application should now redirect to this URL, which in turn will present the OAuth authentication and authorization page to the user. When the provided callback URL is executed, a code value will be returned, which is required for the Create Instance API.
Example cURL Command:
curl -X GET
-H 'Content-Type: application/json'
'https://api.cloud-elements.com/elements/api-v2/elements/slack/oauth/url?apiKey=slack_client_id&apiSecret=slack_client_secret&callbackUrl=https%3A%2F%2Fwww.mycoolapp.com%2Fauth&scope=scope=users%3Awrite%2C+users%3Aread%2C+users.profile%3Aread%2C+users.profile%3Awrite%2C+search%3Aread%2C+files%3Aread%2C+files%3Awrite%3Auser%2C+channels%3Aread%2C+groups%3Aread&response_type'
Response:
{
  "oauthUrl": "https://slack.com/oauth/authorize?scope=users%3Awrite%2C+users%3Aread%2C+users.profile%3Aread%2C+users.profile%3Awrite%2C+search%3Aread%2C+files%3Aread%2C+files%3Awrite%3Auser&response_type=code&redirect_uri=https%3A%2F%2Fwww.mycoolapp.com%2Fauth&state=slack&client_id=slack_client_id",
  "element": "slack"
}
Handle Callback from the Endpoint: Upon successful authentication and authorization by the user, the endpoint will redirect to the callback URL you provided when you setup your application with the endpoint, in our example, https://www.mycoolapp.com/auth. The endpoint will also provide two query string parameters: “state” and “code”. The value for the “state” parameter will be the name of the endpoint, e.g., "slack" in our example, and the value for the “code” parameter is the code required by Cloud Elements to retrieve the OAuth access and refresh tokens from the endpoint. If the user denies authentication and/or authorization, there will be a query string parameter called “error” instead of the “code” parameter. In this case, your application can handle the error gracefully.
Step 2. Create an Instance
To provision your Slack element, use the /instances API.
Below is an example of the provisioning API call.
- HTTP Headers: Authorization- User , Organization
- HTTP Verb: POST
- Request URL: /instances
- Request Body: Required – see below
- Query Parameters: none
token is returned upon successful execution of this API. This token needs to be retained by the application for all subsequent requests involving this element instance.
A sample request illustrating the /instances API is shown below.
HTTP Headers:
Authorization: User <INSERT_USER_SECRET>, Organization <INSERT_ORGANIZATION_SECRET>
This instance.json file must be included with your instance request. Please fill your information to provision. The “key” into Cloud Elements Slack is "slack". This will need to be entered in the “key” field below depending on which element you wish to instantiate.
{
  "element": {
    "key": "slack"
  },
  "providerData": {
    "code": "<CODE_ON_THE_RETURN_URL>"
  },
  "configuration": {
    "oauth.api.key": "<INSERT_CLIENT_ID>",
    "oauth.api.secret": "<INSERT_CLIENT_SECRET>",
    "oauth.callback.url": "<INSERT_CALLBACK_URL>",
    "oauth.scope": "users:write, users:read, users.profile:read, users.profile:write, search:read, files:read, files:write:user, channels:read, groups:read",
    "event.notification.enabled": "true",
    "event.notification.callback.url": "<INSERT_YOUR_APPS_CALLBACK_URL>"
  },
  "tags": [
    "<ADD_YOUR_TAG>"
  ],
  "name": "<INSERT_INSTANCE_NAME>"
}
Here is an example cURL command to create an instance using /instances API.
Example Request:
curl -X POST
-H 'Authorization: User <INSERT_USER_SECRET>, Organization <INSERT_ORGANIZATION_SECRET>'
-H 'Content-Type: application/json'
-d @instance.json
'https://api.cloud-elements.com/elements/api-v2/instances'
If the user does not specify a required config entry, an error will notify which entries are missing.
Below is a successful JSON response:
{
  "id": 123,
  "name": "Test",
  "token": "5MOr3Sl/E4kww6mTjmjBYV/hAUAzz1g=",
  "element": {
    "id": 2103,
    "name": "Slack",
    "key": "slack",
    "description": "Slack brings all your communication together in one place. It's real-time messaging, archiving and search for modern teams.",
    "image": "https://a.slack-edge.com/0180/img/icons/app-256.png",
    "active": true,
    "deleted": false,
    "typeOauth": false,
    "trialAccount": false,
    "resources": [],
    "transformationsEnabled": true,
    "bulkDownloadEnabled": false,
    "bulkUploadEnabled": false,
    "cloneable": true,
    "authentication": {
      "type": "oauth2"
    },
    "hub": "collaboration",
    "protocolType": "http",
    "private": false
  },
  "provisionInteractions": [],
  "valid": true,
  "disabled": false,
  "maxCacheSize": 0,
  "cacheTimeToLive": 0,
  "configuration": {
    "base.url": "https://slack.com/api",
    "oauth.api.secret": "CLIENT_SECRET",
    "event.notification.subscription.id": null,
    "oauth.token.url": "https://slack.com/api/oauth.access",
    "pagination.max": "100",
    "event.vendor.type": "webhooks",
    "oauth.scope": "users:write, users:read, users.profile:read, users.profile:write, search:read, files:read, files:write:user",
    "oauth.user.token": "99845548065-3df640f4b74a86416895b3f9af42bc2b",
    "oauth.authorization.url": "https://slack.com/oauth/authorize",
    "event.notification.instance.finder": "",
    "pagination.type": "page",
    "event.notification.callback.url": "false",
    "oauth.callback.url": "https://www.mycoolapp.com/auth",
    "scope": "users:write, users:read, users.profile:read, users.profile:write, search:read, files:read, files:write:user",
    "oauth.user.refresh_token": null,
    "oauth.token.revoke_url": "https://slack.com/api/auth.revoke",
    "oauth.user.refresh_interval": "3600",
    "oauth.api.key": "CLIENT_ID",
    "oauth.user.refresh_time": null,
    "oauth.basic.header": "true",
    "pagination.page.startindex": "1",
    "event.notification.enabled": "false"
  },
  "eventsEnabled": false,
  "eventsNotificationCallbackUrl": "false",
  "traceLoggingEnabled": false,
  "cachingEnabled": false,
  "externalAuthentication": "none",
  "user": {
    "id": 372
  }
}
Your instance is now created.
Webhook Setup
Once the instance is created, Edit your instance to get a webhook URL.
Here's where you'll find the webhook URL -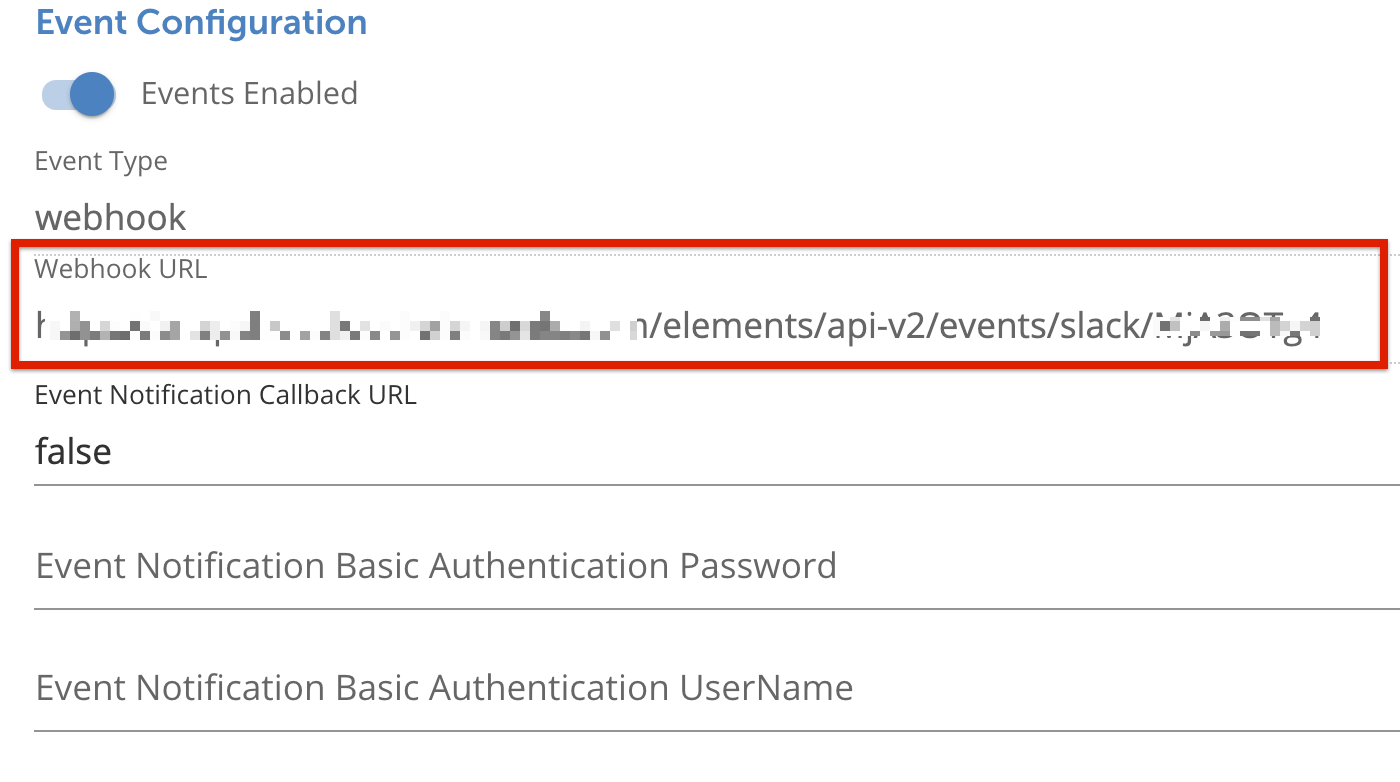
Now log in to your Slack profile. Select the app from "Your Apps".
Under Event Subscriptions:
Toggle Events On
Insert the webhook URL you received after creating the instance in the Request URL field as shown below.

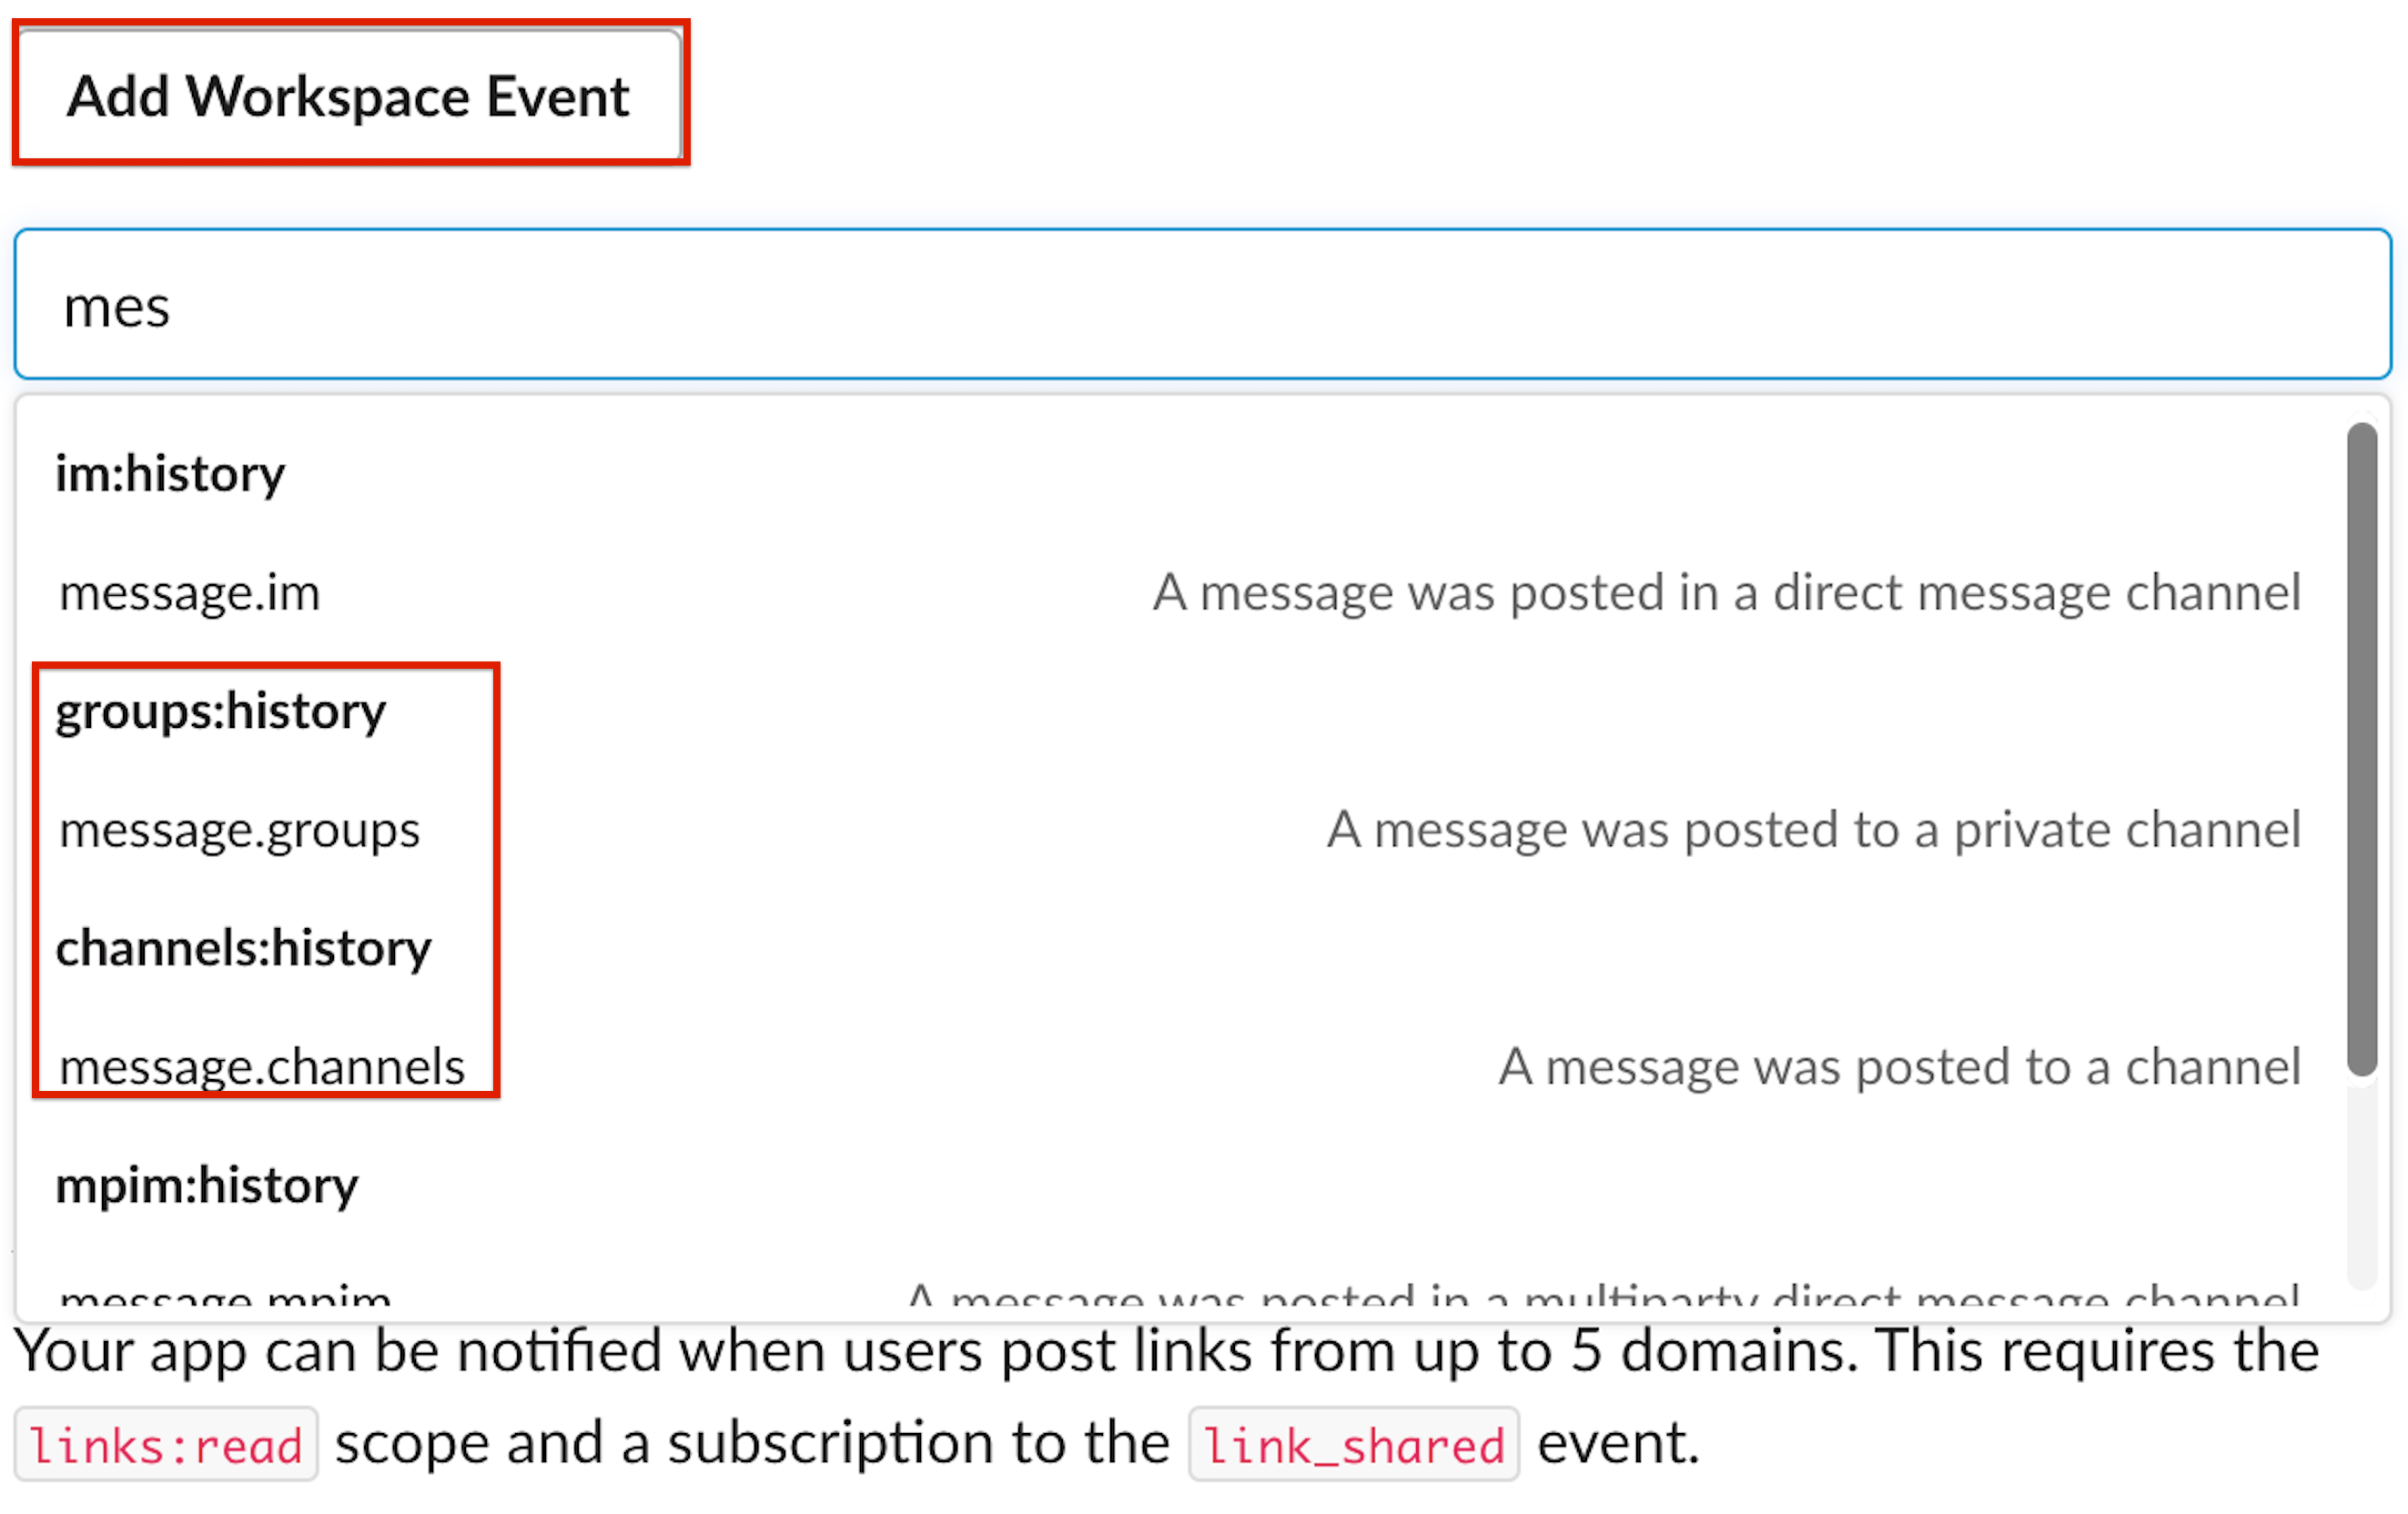
Add Workspace Event > select which events to enable. Here's a picture for your reference.
Save Changes


Events are now implemented for Slack.
