To authenticate a MailChimp v3.0 element instance you must register an app with MailChimp. When you authenticate, use the Client Id, Client Secret, and Redirect URI as the API Key, API Secret, and Callback URL. If you plan to monitor events, also set up webhooks by following the steps in Set Up Events.
See the latest setup instructions in the MailChimp documentation.
Locate Credentials for Authentication
If you already created an application, follow the steps below to locate the Client Id, Client Secret, and Redirect URI. If you have not created an app, see Create an Application.
To find your OAuth 2.0 credentials:
- Log in to your account at MailChimp.
- In the upper right corner, click your name, and then select Account.

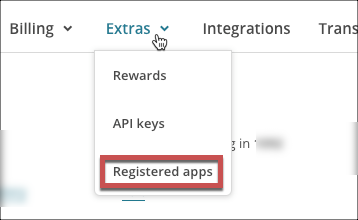
- Click Extras, and then select Registered apps.

- Locate your app, and then click Edit.
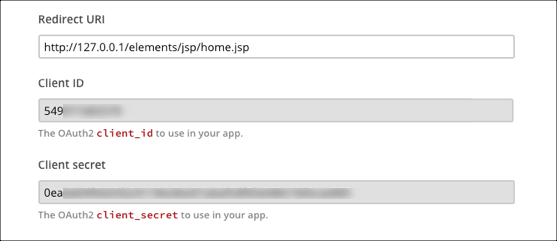
- Scroll down and record the the Redirect URI, Client Id, and Client Secret.

Create an Application
If you have not created an application, you need one to authenticate with MailChimp.
To create an application:
- Log in to your account at MailChimp.
- In the upper right corner, click your name, and then select Account.

- Click Extras, and then select Registered apps.

- Click Register an App.
- Complete the required information.
- In Redirect URI enter the URL that will receive the authorization grant code and return users upon authentication during the OAuth Authorization process.
- Click Create.
- Scroll down and record the the Redirect URI, Client Id, and Client Secret.

Set Up Events
MailChimp supports webhooks. If you want to enable events when you authenticate an element instance, complete the steps below to set up webhooks with MailChimp. You can set up webhooks after you authenticate with a POST /lists/{id}/webhook request.
To set up webhooks:
- Log in to your account at MailChimp.
- Navigate to your Lists
- Choose the list to add a webhook to, and then navigate to the Settings.

- Scroll down and click Webhooks.
- Click Create New Webhook.
- In Callback URL enter the URL to receive webhook notifications, such as
https://api.cloud-elements.com/elements/api-v2/events/mailchimpv3. - Set up your webhook, and then click Save.
- Record the Callback URL which you will use when you set up events as the Event Notification Callback URL.


