On this page:
Authentication Prerequisites
The Jira element uses two kinds of authentication workflows - Basic and OAuth 2.0.
Authenticate via OAuth 2.0
You will need trial or paid Jira account and sandbox.
Generate OAuth credentials
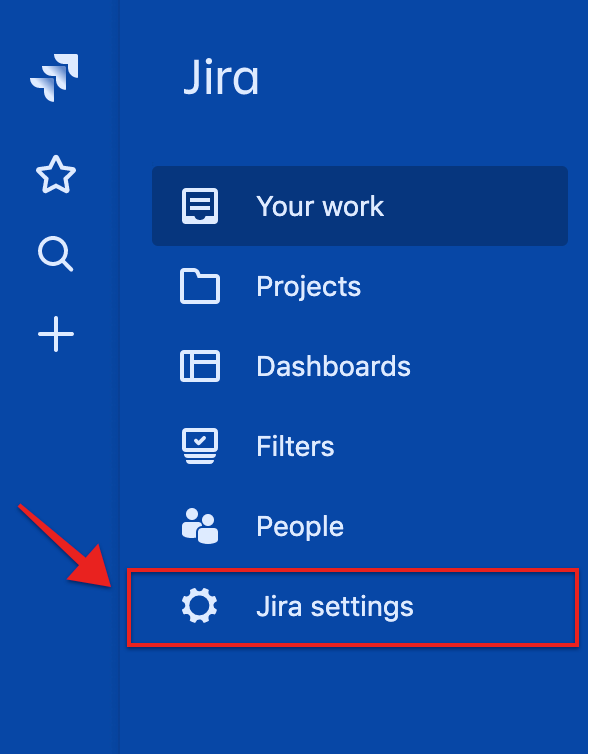
To generate or retrieve OAuth credentials for your Jira account, follow these steps:
- In a web browser, navigate to the site URL containing your domain. It should look something like this - https://{yourdomain}.atlassian.net. Sign in.
- On the navigation panel to your left, click Jira Settings.
- Click Apps.
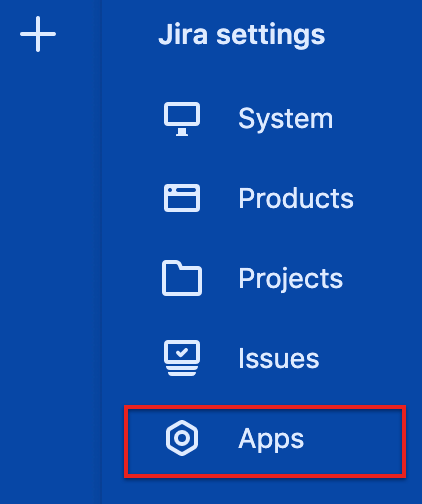
- On the Apps menu, click OAuth credentials.
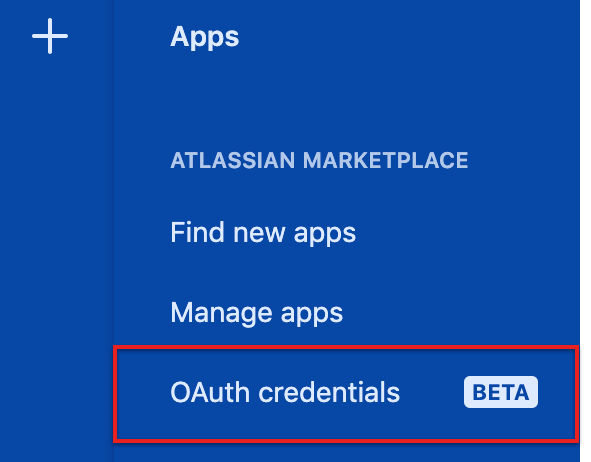
- From the OAuth credentials section of your page, click Create new credentials.

- On the Create new credentials panel:
- Name your app.
- Enter your Base URL and Logo URL.
- Enable all app permissions and click Create.
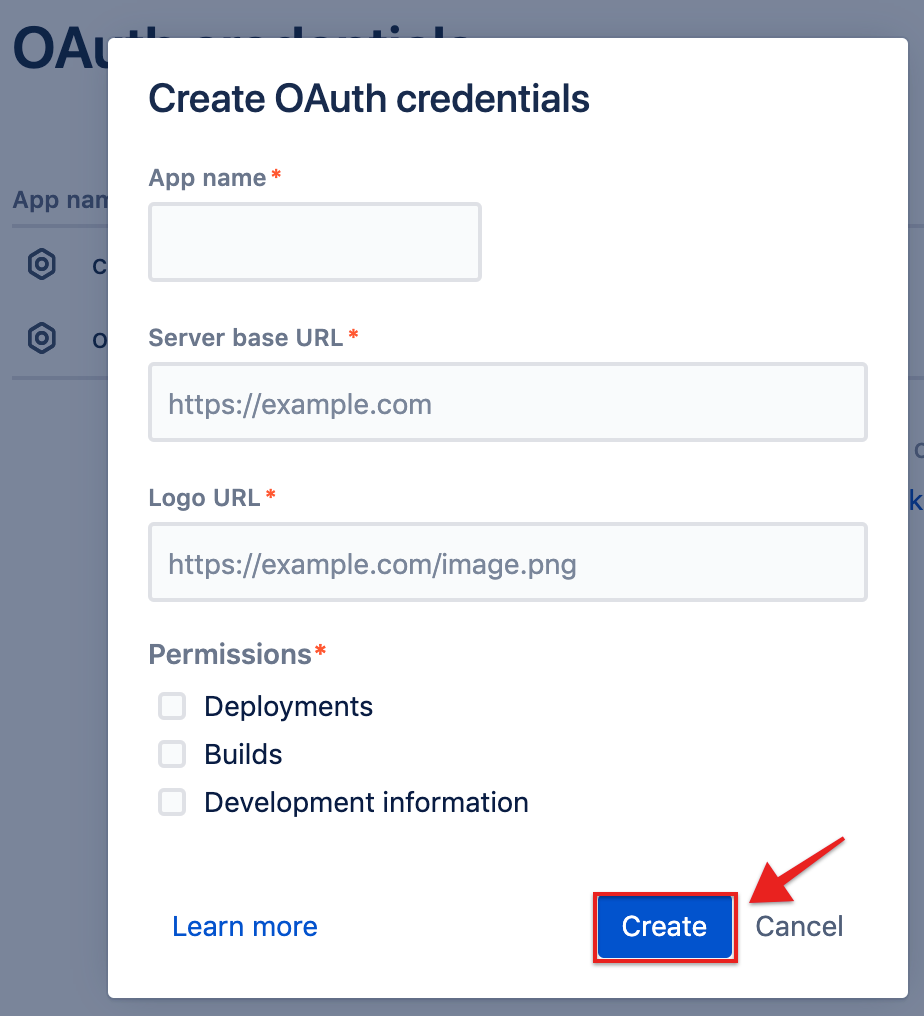
- You app along with your Client ID and Client secret will appear on the page. When you have both a Client ID and Client secret, copy and paste the values, which you will use when you authenticate an element instance.


Authenticate via Basic
To authenticate with the Jira element using Basic workflow, you will need:
- Username
- Password
- Server URL
Required Authentication Parameters
You can authenticate an element instance using the UI or via API calls. For detailed information on how to authenticate an instance, see our related documentation:
To authenticate an instance of the Xero element, you will need the following parameters:
| Parameter Name/UI Value | API Value | Description | Source |
|---|---|---|---|
| OAuth API Key | oauth.api.key | Generated before authentication for OAuth 2 workflow | Generate OAuth Creds |
| OAuth API Secret | oauth.api.secret | Generated before authentication for OAuth 2 workflow | Generate OAuth Creds |
| Site URL | site.url | The site URL containing your domain, for example, https://{yourdomain}.atlassian.net | Generate OAuth Creds |
| Username | username | Generated before authentication for basic workflow | Authenticate via basic |
| API key | password | Generated before authentication for basic workflow | Authenticate via basic |
| Server URL | base.url | The Jira server endpoint URL. | Authenticate via basic |
| OAuth Callback URL | oauth.callback.url | Default value is https://auth.cloudelements.io/oauth | Authenticate an Element Instance (API) |
Sample Configuration JSON
Oauth 2.0
"configuration": {
    "oauth.api.key": "[myApiKey]",
    "oauth.api.secret": "[myApiSecret]",
    "site.url": "[mySiteURL]",
    "oauth.callback.url": "https://auth.cloudelements.io/oauth"
  }
Basic
"configuration": {
    "username": "[myUsername]",
    "password": "[myPassword]",
    "base.url": "[myServerURL]",
    "oauth.callback.url": "https://auth.cloudelements.io/oauth"
  }
Element Fact Sheet and Reference
Authentication and Configuration Parameters
To see all authentication parameters for the Jira element, follow these steps:
- Sign in to Cloud Elements and navigate to Elements.
- Hover over the card for an element, and then click My Resources.

- In the top navigation toolbar, click Setup.
- From the Setup page, you can view a complete list of the element's authentication and configuration parameters.

Events and Supported Resources
The Jira element supports events via webhooks. For detailed information about our Events framework and how to configure an element instance with events, please see Events Overview.
In order to enable webhooks, add these extra configurations to your instance JSON:
"event.notification.enabled": "true",
"event.notification.callback.url": "<INSERT_YOUR_APPS_CALLBACK_URL>"
To provision your JIRA element with webhooks enabled, use the following JSON when calling the /instances API.
{
  "element": {
    "key": "jira"
  },
  "configuration": {
    "jira.username": "<INSERT_JIRA_USERNAME>",
    "jira.password": "<INSERT_JIRA_PASSWORD>",
    "jira.api.url": "<INSERT_JIRA_SUBDOMAIN_URL>",
    "event.notification.enabled": "true",
    "event.notification.callback.url": "<INSERT_YOUR_APPS_CALLBACK_URL>"
  },
  "tags": [
    "<INSERT_TAGS>"
  ],
  "name": "<INSERT_INSTANCE_NAME>"
}
Jira Bulk
Cloud Elements Bulk API calls provide an option to upload a large number of resources, such as contacts, into a Cloud Service all at once. The Bulk APIs require the name of the object identified within the cloud service and a .csv file with populated data included in each request. Cloud Elements provides discovery services to get a list of available objects.
If you configured the Callback Notification Signature Key (event.notification.signature.key) when you authenticated an element instance, the bulk APIs will use the signature key to provide hash verification in the header of bulk jobs. For more information, see Hash Verification.
First we will make the GET /objects call to retrieve a list of available objects
curl -X GET
-H 'Authorization: Element <INSERT ELEMENT TOKEN>, User <INSERT_USER_SECRET>'
'https://api.cloud-elements.com/elements/api-v2/hubs/marketing/objects'
Example of Successful Response:
[
  "activities",
  "contact",
  "campaign",
  "list",
  "account"
]
The “contact” object is available. We will use contact in our bulk upload. It will be placed in our request URL.
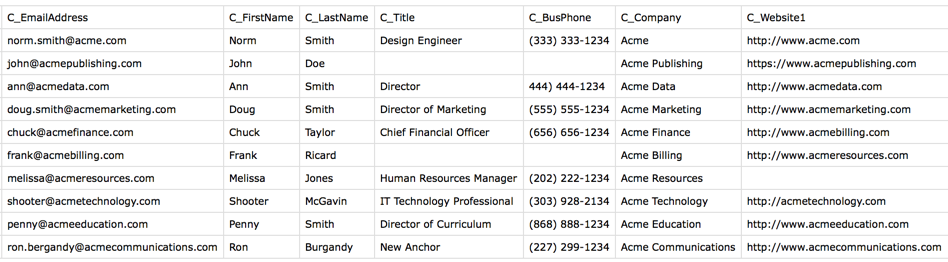
A csv file with populated data is required in our request, like the one seen below.
Example data will be used in this demonstration.
An Example request can be seen below.:
curl -X POST
-H 'Authorization: Element <INSERT ELEMENT TOKEN>, User <INSERT_USER_SECRET>'
-F file=@sample.csv
'https://api.cloud-elements.com/elements/api-v2/hubs/marketing/bulk/contact?path=/sample.csv'
Example of Successful Response:
{
  "id": "1234",
  "status": "CREATED"
}
An id is assigned to job. This can be used to check the status of a bulk job.
The id “1234” will be used in the request URL in the next example.
curl -X GET
-H 'Authorization: Element <INSERT ELEMENT TOKEN>, User <INSERT_USER_SECRET>'
'https://api.cloud-elements.com/elements/api-v2/hubs/marketing/bulk/1234/status'
Example of Successful Response:
{
  "id": "1234",
  "status": "COMPLETE"
}
Once the job is completed, login to the cloud service an find your newly created contacts.
Queryable Endpoints
You can use CEQL to query the following endpoints of the Xero element:
- GET /agents
- GET /contacts
- GET /groups
- GET /incidents
- GET /incidents/{incidentId}/{objectName}
- GET /notification-schemes
- GET /{objectName}
- GET /{objectName}/{objectId}/{childObjectName}
- GET /permission-schemes
- GET /projects
- GET /worklogs
Element API Documentation
The base URL for all API requests is https://api.cloud-elements.com/elements/api-v2.
