An authenticated element instance represents a connection between a single user and an API provider where they have an account. When you authenticate with an API Provider you create an element instance in Cloud Elements. Use the authenticated element instance to apply logic to the element instance with formulas, map your element instance to a common resources, and test your instance in the API docs.
When you authenticate through Cloud Elements, you authorize Cloud Elements to access your data at the API provider. If you need to authorize your own application to access an API provider use the /instances API.
Authenticate an Element Instance
Each API provider is different. You can authenticate an element instance through Cloud Elements, or via the /instances API. Because of the differences between each element, Cloud Elements provides detailed documentation for each element. The element documentation includes steps to prepare for authentication, how to authenticate through Cloud Elements or the instances API, and additional information about bulk, querying, and events.
View Element Instance Information
Each authenticated element instance is identifiable by it's unique element instance ID and element instance token. Use the element instance ID to refer to the instance in formulas and scripts. Cloud Elements uses the element instance token to authenticate with an API provider. You must pass the element instance token in the header of any API requests to the element.
To locate your element instance ID and element instance token:
- Click the instances banner on an element card.
- Note the element instance ID at the top of the card.
- Hover over the element instance card, and then click View Token.
Test an Element Instance
After you authenticate an element instance, you can test it with the API docs. So long as you have an authenticated element instance, you can test any of the requests in the API docs. For more information about the element API docs, see the Overview.
To test your element instance:
- Click the instances banner on an Element card.
- Hover over the element instance card, and then click API Docs.
- Expand the endpoint that you want to make a request to.
- Click Try it Out.
- Supply any additional or required information.
- Click Execute.
Update an Element Instance
You can edit your element instance or re-authenticate with an API provider. If you just need to change basic information about the element, you can update without re-authenticating. However, if you need to add events or update some configuration value, you must re-authenticate.
/instances API.To update an authenticated element instance:
- Click the instances banner on an element card.
- Hover over the element instance card, and then click Edit.
- Make your changes, and then click Update.
To re-authenticate an authenticated element instance:
- Click the instances banner on an Element card.
- Hover over the element instance card, and then click Edit.
- Make your changes, and then click Re-Authenticate.
Delete
You can delete an element instance, which permanently deletes the instance and it's element instance token from Cloud Elements.
To delete an element instance:
- Click the instances banner on an element card.
- Hover over the element instance card, and then click Delete.
- Confirm the deletion.
Use the UI to authenticate an element instance so you can test API requests and get a feel for the functionality available in the element. If you are ready to integrate our code in your app, take a look at how to authenticate an element instance using our APIs in a specific element doc.
Note: Each element is different and you should check the documentation for the specific element that you are connecting to for details.
To authenticate an element instance:
- Sign in to Cloud Elements 2.0, and then search for the element in our Elements Catalog.
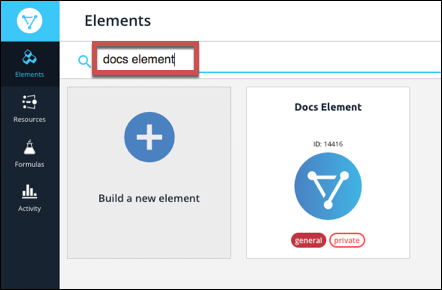
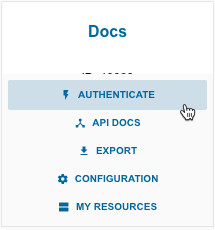
- Hover over the element card, and then click Authenticate.
- Enter a name for the element instance.
- Complete any element-specific information. See the documentation for the element for details.
- Optionally type or select one or more tags to add to the authenticated element instance.
- Click Create Instance.

After successfully authenticating, we give you several options for next steps. Make requests using the API docs associated with the instance, map the instance to a virtual data resource resource, or use it in a formula template.
This section provides a summary of how to authenticate an element instance with events. Each element is different, so take a look at the Events section of the specific Element guide. You can authenticate via Cloud Elements 2.0 or APIs.
Authenticate an Element Instance with Polling
Authenticating an element instance with events works the same as authenticating an instance, you just need to turn on events and set a few more parameters.
For more information about each field described here, see Parameters.
To authenticate an element instance with polling:
- Enter the basic information required to authenticate an element instance as described in the element-specific document or the generic steps in Authenticate an Element Instance.
- To enable hash verification in the headers of event callbacks, click Show Optional Fields, and then add a key to Callback Notification Signature Key.
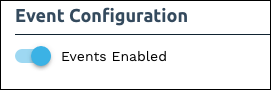
- Enable events: Switch Events Enabled on.
- If the element supports both polling and webhooks, select the type of event in Event Type.
- Use the Event poller refresh interval (mins) slider or enter a number in minutes to specify how often Cloud Elements should poll for changes.
- Select the resources to poll.
- Advanced users can further configure polling:
- Click
 to edit the polling configuration JSON directly.
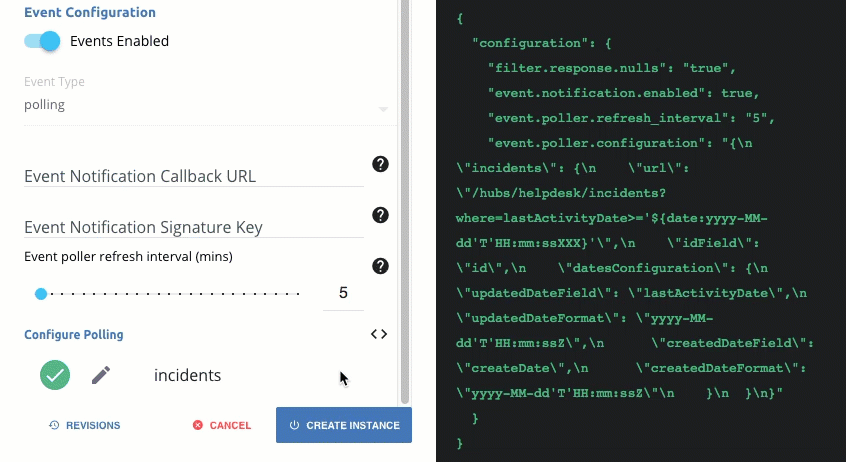
- Click
 to access the poller configuration.
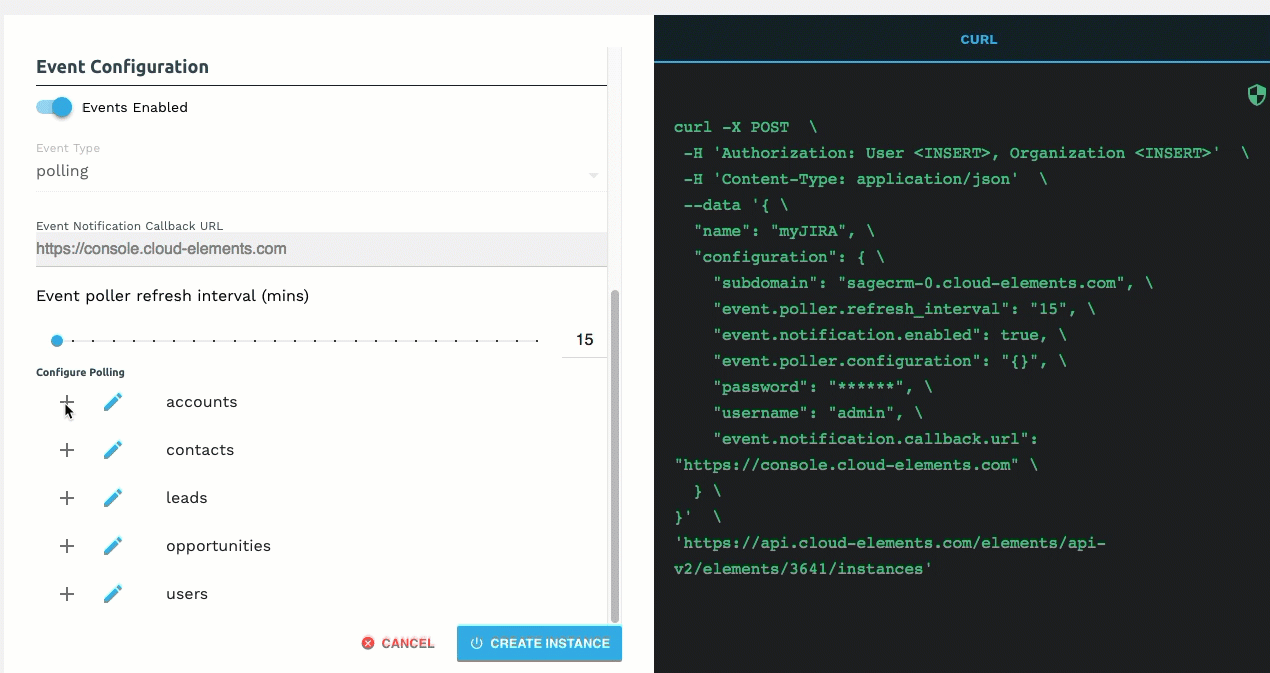
The code view on the right updates the
event.poller.configurationJSON object with the default polling configuration. You can change the polling configuration for each authenticated instance.
- Click
- Optionally type or select one or more Element Instance Tags to add to the authenticated element instance.
- Click Create Instance.

 to edit the polling configuration JSON directly.
 to access the poller configuration.
Your polling configuration is complete and you can authenticate the element instance. Use the events to build formulas to accomplish a wide variety of workflows.
Polling Parameters
Labels and buttons on the UI correspond to parameters in the JSON. The table below shows UI labels and buttons in bold and the equivalent parameters in the configuration JSON object in code formatting. 
| Parameter | Description | Data Type |
|---|---|---|
Events Enabledevent.notification.enabled | Identifies that events are enabled for the element instance. Default: false. | boolean |
Event Typeevent.vendor.type | The type of event, either polling or webhook. | string |
Event Notification Callback URLevent.notification.callback.url | The URL where you want Cloud Elements to send the events. | string |
Event poller refresh interval (mins)event.poller.refresh_interval | A number in minutes to identify how often the poller should check for changes. | number |
Callback Notification Signature Keyevent.notification.signature.key | Optional. A user-defined key for added security to show that events have not been tampered with. | string |
Configure Pollingevent.poller.configuration | Configuration parameters for polling. Tip: The default polling configuration represents the optimal configuration. Although you can change anything in the poller configuration, we recommend that you do so rarely and in conjunction with Cloud Elements support. | JSON object |
Resource to PollresourceName (e.g., contacts) | The polling event configuration of the resource that you will monitor. | JSON object |
URLurl | The url to query for updates to the resource. | String |
ID FieldidField | The field in the resource that is used to uniquely identify it. | String |
Advanced FilteringdatesConfiguration | Configuration parameters for dates in polling. | JSON Object |
Updated Date FieldupdatedDateField | The field that identifies an updated object. | String |
Updated Date FormatupdatedDateFormat | The date format of the field that identifies an updated object. | String |
Created Date FieldcreatedDateField | The field that identifies a created object. | String |
Created Date FormatcreatedDateFormat | The date format of the field that identifies a created object. | String |
Authenticate an Element Instance with Webhooks
Authenticating an element instance with events works the same as authenticating an instance, you just need to turn on events and set a few more parameters.
To authenticate an element instance with webhooks:
- Enter the Name of the element instance and any configuration parameters need to authenticate the element instance.
- To enable hash verification in the headers of event callbacks, click Show Optional Fields, and then add a key to Callback Notification Signature Key.
- Enable events: Switch Events Enabled on.
- If the element supports both polling and webhooks, select webhooks in Event Type.
Add an Event Notification Callback URL to receive information about the events.
Note: In most cases you must set up the event callback URL as part of API provider's webhook setup, and what you enter here should match.
Your webhooks configuration is complete and you can authenticate the element instance. Use the events to build formulas to accomplish a wide variety of workflows.
Webhook Parameters
Labels and buttons on the UI correspond to parameters in the JSON. The table below shows UI labels and buttons in bold and the equivalent parameters in the configuration JSON object in code formatting. 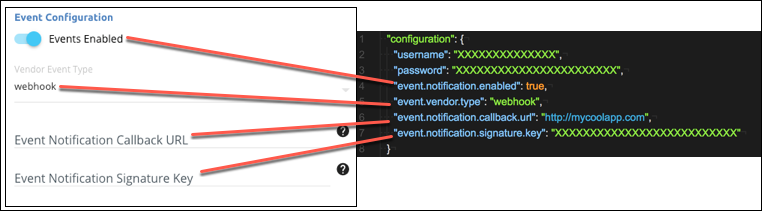
| Parameter | Description | Data Type |
|---|---|---|
Events Enabledevent.notification.enabled | Identifies that events are enabled for the element instance. Default: false. | boolean |
Event Typeevent.vendor.type | The type of event, either polling or webhook. | string |
Event Notification Callback URLevent.notification.callback.url | The URL where you want Cloud Elements to send the events. | string |
Callback Notification Signature Keyevent.notification.signature.key | Optional. A user-defined key for added security to show that events have not been tampered with. | string |
How you authenticate an element instance with our APIs differs significantly from element to element based on the API provider's authentication requirements (OAuth 2.0, basic, OAuth 1.0, or custom) and any specific information that they require. However, the payload that you send always includes basic information including the name of the element instance, a configuration array to pass required information to the provider, tags to help you categorize the instance, and an optional request to retrieve details about the objects retrieveObjectsAfterInstantiation (see more on this below).
You can authenticate an element instance withe either of the following endpoints:
- POST /instances
- POST /elements/{id}/instances (do not include
"key": "Element Key"in the body of the request).
Here is an example payload to authenticate an element instance with OAuth 2.0 authentication:
 {
  "element":{
    "key":"<Element Key>"
  },
  "providerData":{
    "code":"<Authorization Grant Code>"
  },
  "configuration":{
    "oauth.api.key": "<OAuth app API or Client Key>",
    "oauth.api.secret":"<OAuth app API or Client Secret>",
    "oauth.callback.url":"<Callback URL>"
  },
  "tags":[
    "Tag Name 1",
    "Tag Name 2"
  ],
  "name":"Instance Name",
  "retrieveObjectsAfterInstantiation": true
}
Here is an example payload to authenticate an element instance with basic authentication
{
  "element": {
    "key": "<Element Key>"
  },
  "configuration": {
    "username": "<User Name>",
    "password": "<Password>"
  },
  "tags": [
    "Tag Name 1",
    "Tag Name 2"
	],
  "name": "<Instance Name>",
  "retrieveObjectsAfterInstantiation": true
}
Include Objects in the Response
You can return a list of all data objects in an element along with their source (the vendor, a Virtual Data Resource, or normalized Cloud Elements object). In the request body include the optional "retrieveObjectsAfterInstantiation": true value. The response includes an objects array like this example:
  "objects": [
    {
        "name": "incidents",
        "vendorName": "Case",
        "type": "ceCanonical"
    },
    {
        "name": "Task",
        "vendorName": "Task",
        "type": "vendor"
    },
    {
        "name": "myAccounts",
        "vendorName": "Account",
        "type": "vdr"
    }
  ]
The objects list includes:
nameThe name of the element object. This is name that you'll find in the API docs and endpoints. For example, requests to the objects in the example would look likeGET https://api.cloud-elements.com/elements/api-v2/incidents(or/Taskor/myAccounts).vendorNameThe name of the object specified within the API provider's system.typeSpecifies where the object is defined:vdrindicates that the object is a user-defined virtual data resource that is mapped to the API provider resource identified in thevendorNameattribute. For more information see Introduction to Virtual Data Resources.ceCanonicalindicates a normalized Cloud Elements object associated with the raw API provider object identified in thevendorNameattribute.vendorindicates that the object is available to use via theGET /{objectName}endpoint. Requests bypass any Cloud Elements mappings and call the vendor endpoint directly, while still proxied by Cloud Elements. In this case,nameandvendorNameattributes are identical.
This section provides a summary of how to authenticate an element instance with events. Each element is different, so take a look at the Events section of the Element Guide. You can authenticate via Cloud Elements 2.0 or APIs.
Authenticate an Element Instance with Polling
Authenticating an element instance with events works the same as authenticating an instance, you just need to turn on events and set a few more parameters.
To authenticate an element instance with polling events add the polling configuration to the JSON body of your POST /instances request. See the Authenticate and Events sections of the Element Guide for the element that you want to monitor for element-specific steps.
For more information about each field described here, see Polling Parameters.
Polling Configuration
In the configuration JSON object, add the following event and polling configuration parameters when authenticating an element instance with polling events:
event.notification.enabled: trueevent.vendor.type: pollingevent.notification.callback.url: <YOUR_CALLBACK_URL>event.notification.signature.key: <OPTIONAL_SIGNATURE_KEY>event.poller.refresh_interval: <NUMBER IN MINUTES>event.poller.configuration: <POLLING_CONFIGURATION>
Here is an example of an element that uses Basic authentication with the required polling configuration values. The usual body to authenticate an element instance only includes the username and password parameters, the rest are event and polling-specific parameters.
{
  "element":{
    "key":"elementKey"
  },
  "configuration":{
    "username": "xxxxxxxxxxxxxxxxxx",
    "password": "xxxxxxxxxxxxxxxxxxxxxx",
    "event.notification.enabled": true,
    "event.vendor.type": "polling",
    "event.notification.callback.url": "http://mycoolapp.com",
    "event.poller.refresh_interval": "<minutes>",
    "event.notification.signature.key": "xxxxxxxxxxxxxxxxxxxxxxxxx",
    "event.poller.configuration":{
      "contacts":{
        "url":"/hubs/crm/contacts?where=lastUpdated>'${gmtDate:yyyy-MM-dd'T'HH:mm:ss'Z'}'",
        "idField":"id",
        "datesConfiguration":{
          "updatedDateField":"_info.lastUpdated",
          "updatedDateFormat":"yyyy-MM-dd'T'HH:mm:ss'Z'",
          "updatedDateTimezone":"GMT",
          "createdDateField":"_info.lastUpdated",
          "createdDateFormat":"yyyy-MM-dd'T'HH:mm:ss'Z'",
          "createdDateTimezone":"GMT"
        }
      }
    }
  },
  "tags":[
    "<Add_Your_Tag>"
  ],
  "name":"<INSTANCE_NAME>"
}
Polling Parameters
Labels and buttons on the UI correspond to parameters in the JSON. The table below shows UI labels and buttons in bold and the equivalent parameters in the configuration JSON object in code formatting.
| Parameter | Description | Data Type |
|---|---|---|
Events Enabledevent.notification.enabled | Identifies that events are enabled for the element instance. Default: false. | boolean |
Event Typeevent.vendor.type | The type of event, either polling or webhook. | string |
Event Notification Callback URLevent.notification.callback.url | The URL where you want Cloud Elements to send the events. | string |
Event poller refresh interval (mins)event.poller.refresh_interval | A number in minutes to identify how often the poller should check for changes. | number |
Callback Notification Signature Keyevent.notification.signature.key | Optional. A user-defined key for added security to show that events have not been tampered with. | string |
Configure Pollingevent.poller.configuration | Configuration parameters for polling. Tip: The default polling configuration represents the optimal configuration. Although you can change anything in the poller configuration, we recommend that you do so rarely and in conjunction with Cloud Elements support. | JSON object |
Resource to PollresourceName (e.g., contacts) | The polling event configuration of the resource that you will monitor. | JSON object |
URLurl | The url to query for updates to the resource. | String |
ID FieldidField | The field in the resource that is used to uniquely identify it. | String |
Advanced FilteringdatesConfiguration | Configuration parameters for dates in polling. | JSON Object |
Updated Date FieldupdatedDateField | The field that identifies an updated object. | String |
Updated Date FormatupdatedDateFormat | The date format of the field that identifies an updated object. | String |
Created Date FieldcreatedDateField | The field that identifies a created object. | String |
Created Date FormatcreatedDateFormat | The date format of the field that identifies a created object. | String |
Authenticate an Element Instance with Webhooks
Authenticating an element instance with events works the same as authenticating an instance, you just need to turn on events and set a few more parameters.
To authenticate an element instance with webhook events add the webhook configuration to the JSON body of your POST /instances request. See the Authentication and Events sections of the Element Guide for the element that you want to monitor for element-specific steps.
For more information about each field described here, see Webhooks Parameters.
Webhook Configuration
In the configuration JSON object, add the following event and webhook configuration parameters when authenticating an element instance with webhook events:
event.notification.enabled: trueevent.vendor.type: webhooksevent.notification.callback.url: <YOUR_CALLBACK_URL>event.notification.signature.key: <OPTIONAL_SIGNATURE_KEY>
Here is an example of an element that uses Basic authentication with the required polling configuration values. The usual body to authenticate an element instance only includes the username and password parameters, the rest are event and polling-specific parameters.
{
  "element":{
    "key":"elementKey"
  },
  "configuration":{
    "username": "xxxxxxxxxxxxxxxxxx",
    "password": "xxxxxxxxxxxxxxxxxxxxxx",
    "event.notification.enabled": true,
    "event.vendor.type": "webhooks",
    "event.notification.callback.url": "http://mycoolapp.com",
    "event.notification.signature.key": "xxxxxxxxxxxxxxxxxxxxxxxxx"
  },
  "tags":[
    "<Add_Your_Tag>"
  ],
  "name":"<INSTANCE_NAME>"
}
Webhook Parameters
Labels and buttons on the UI correspond to parameters in the JSON. The table below shows UI labels and buttons in bold and the equivalent parameters in the configuration JSON object in code formatting.
| Parameter | Description | Data Type |
|---|---|---|
Events Enabledevent.notification.enabled | Identifies that events are enabled for the element instance. Default: false. | boolean |
Event Typeevent.vendor.type | The type of event, either polling or webhook. | string |
Event Notification Callback URLevent.notification.callback.url | The URL where you want Cloud Elements to send the events. | string |
Callback Notification Signature Keyevent.notification.signature.key | Optional. A user-defined key for added security to show that events have not been tampered with. | string |
The average time to live for an OAuth2 code is 30 seconds, but varies depending on the API provider. We recommend making the OAuth2 exchange as soon as possible.
Whether or not authentication is revoked or expires after a user changes their password is dependent on the provider. In most scenarios, a token is not revoked after a user-invoked password change, because changing a password doesn't compromise an access token. However, adding two-factor authentication may revoke access tokens because it changes the auth flow, forcing the user to re-login with two-factor auth.
If you have an existing refresh token and you want to create a new instance without having to go through the authentication flow, it's possible to do so by making a POST /instances call and supplying the refresh token as part of your configurations. There's also one key field that is needed to make this happen. In your request body, you'll add "externalAuthentication": "initial". Essentially, this lets you bypass the authentication flow and proceed to provision an instance. When the refresh occurs, we'll update your access and refresh token accordingly.
curl -X POST \
 https://api.cloud-elements.com/elements/api-v2/instances \
 -H 'Authorization: Organization <ORG_SECRET>, User <USER_SECRET>' \
 -H 'Content-Type: application/json' \
 -H 'cache-control: no-cache' \
 -d '{
 "element": {
 "key": "<ELEMENT_KEY>"
 },
 "configuration": {
 "oauth.user.refresh_token": "<OAUTH_REFRESH_TOKEN>",
 "oauth.api.key": "<OAUTH_API_KEY>",
 "oauth.api.secret": "<OAUTH_API_SECRET>",
 "oauth.scope": "<OPTIONAL_SCOPE>"
 },
 "name": "Creating instance from refresh token",
 "externalAuthentication": "initial"
}'
There are a handful of element-specific articles available that discuss how to reauthenticate through the API as opposed to through the Cloud Elements 2.0 user interface, but this article's purpose is to provide guidelines on reauthenticating element instances through an example. Revoking an OAuth token can be useful when testing your application and handling response codes other than 200 when an instance needs to be re-authenticated. As there can be specific requirements between each API provider (such as Box, Salesforce, or Quickbooks) this article will not address how to create a cloud service OAuth application and the discussion relies on OAuth credentials having already been obtained.
The first question that likely crosses your mind when thinking about how to reauthenticate instances is "how can I simulate invalidated/expired/revoked tokens for my instance?" Each software vendor and cloud service endpoint that you interact with can have their own unique ways of allowing you to revoke user tokens through their UI or through API calls to `revoke` endpoints, but here are a few examples of calls to revoke OAuth tokens through API:
Box:
curl -X POST \
https://api.box.com/oauth2/revoke \
-H 'Cache-Control: no-cache' \
-H 'Content-Type: application/x-www-form-urlencoded' \
-d 'client_id=MY_CLIENT_ID&client_secret=MY_CLIENT_SECRET&token=MY_TOKEN'
Salesforce:
curl -X POST \
'https://na54.salesforce.com/services/oauth2/revoke?token=MY_TOKEN' \
-H 'Cache-Control: no-cache' \
-H 'Content-Type: application/json' \
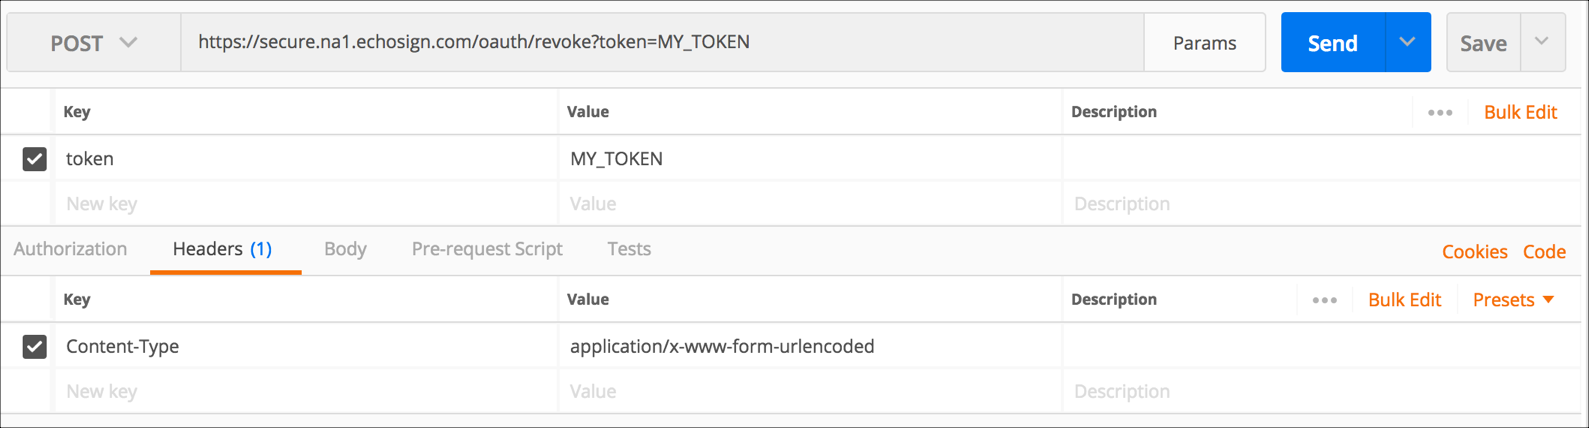
Adobe Sign:
curl -X POST \
'https://secure.na1.echosign.com/oauth/revoke?token=MY_TOKEN' \
-H 'Cache-Control: no-cache' \
-H 'Content-Type: application/x-www-form-urlencoded' \To revoke a user's OAuth token you must first determine the existing token value. One way to do this is with GET /instances (with the full Authorization header of your instance user/organization/Cloud Elements 2.0 tokens) and retrieve the oauth.user.token value from the configuration object. You can get this value through other methods as well, but this API GET call is used in this example. By hitting the above endpoints with the appropriate OAuth Token you can invalidate the authorization for that Cloud Elements 2.0 instance, then go through the OAuth flow to retrieve a new Provider Code and simply pass the new code to PATCH /instances (again with the full Cloud Elements Authorization header for your existing element instance) to reauthenticate it.
To illustrate, let's take the Cloud Elements 2.0 Adobe Sign for example:
GET /instanceswith the full authorization header (User, Organization, and Element tokens).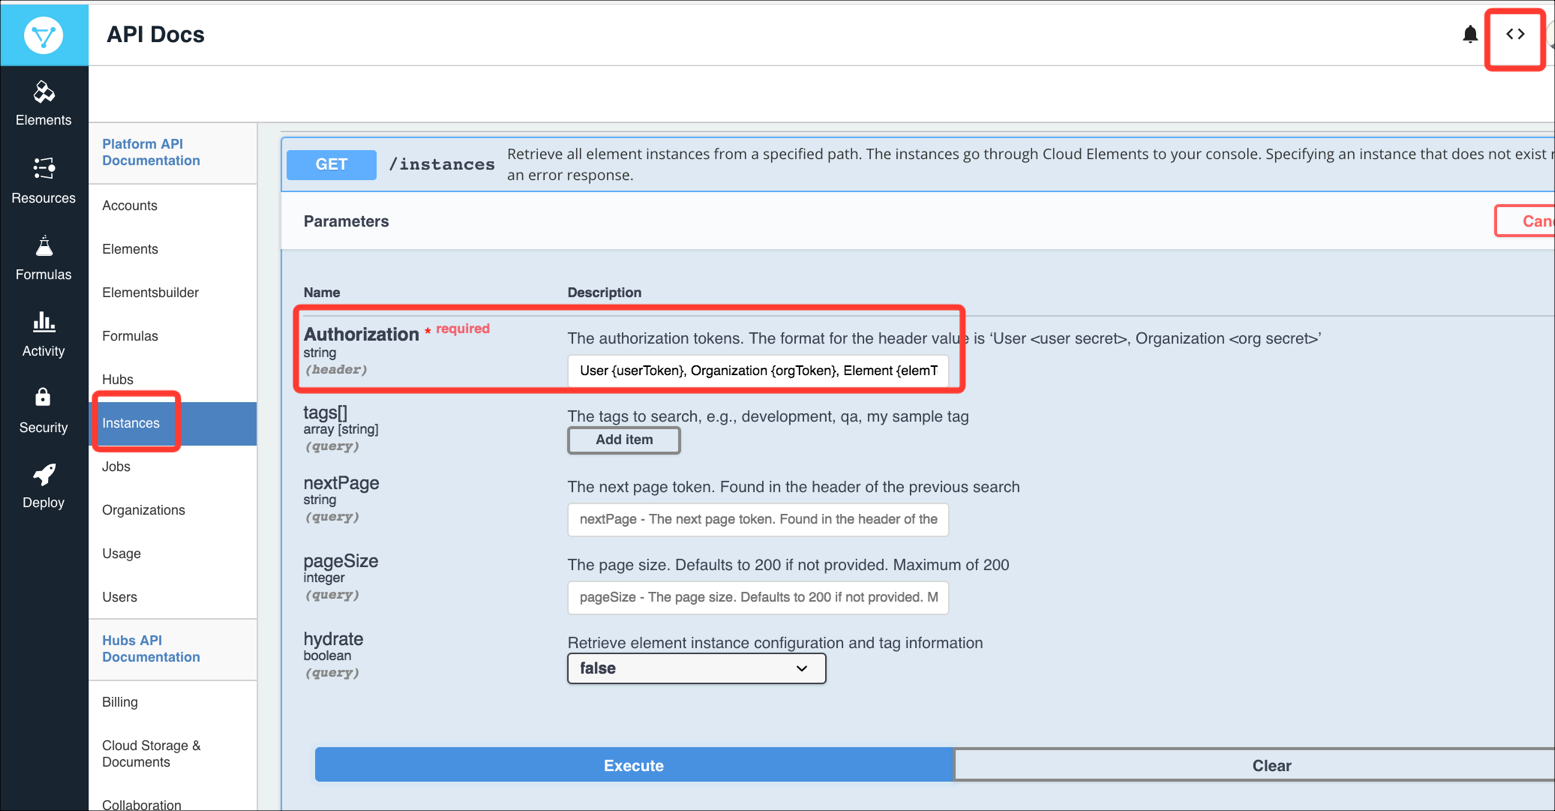
- Locate the
configurationobject, and retrieve the currentoauth.user.tokenvalue.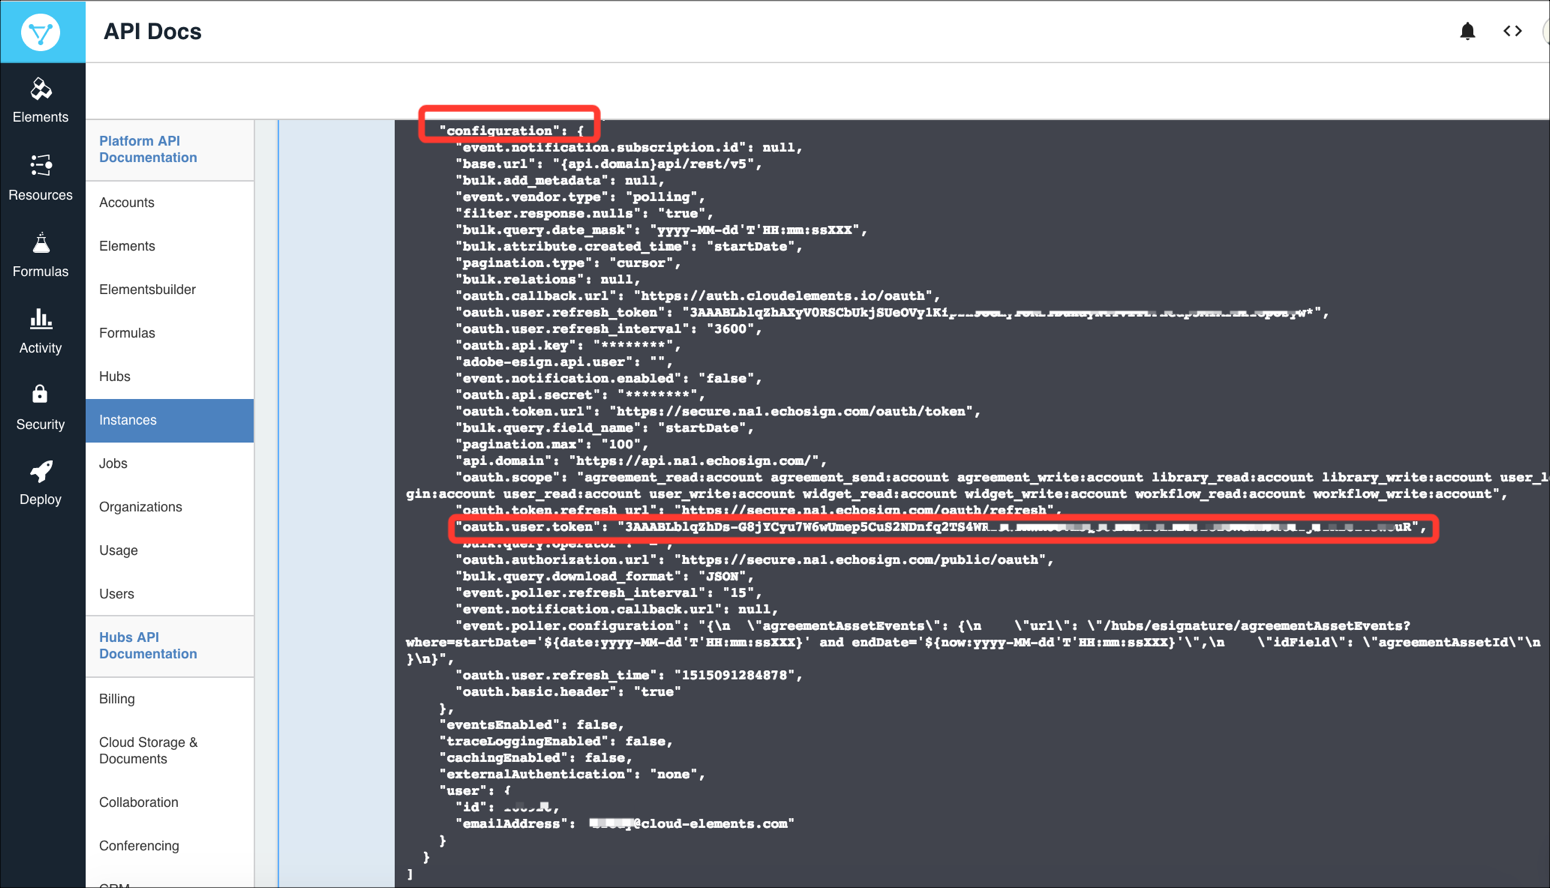
- Make an API call directly against the API provider's endpoint to revoke the OAuth token, and supply the required parameters/payload. Confirm that a successful 200 response is returned indicating that the revocation was successful.
- Attempt to make an API request to any endpoint of the Cloud Elements 2.0 instance, and confirm that a response is returned such as 401 "Request failed" due to INVALID_ACCESS_TOKEN.

- Generate an OAuth URL by making a call to
GET elements/{elementID}/oauth/url.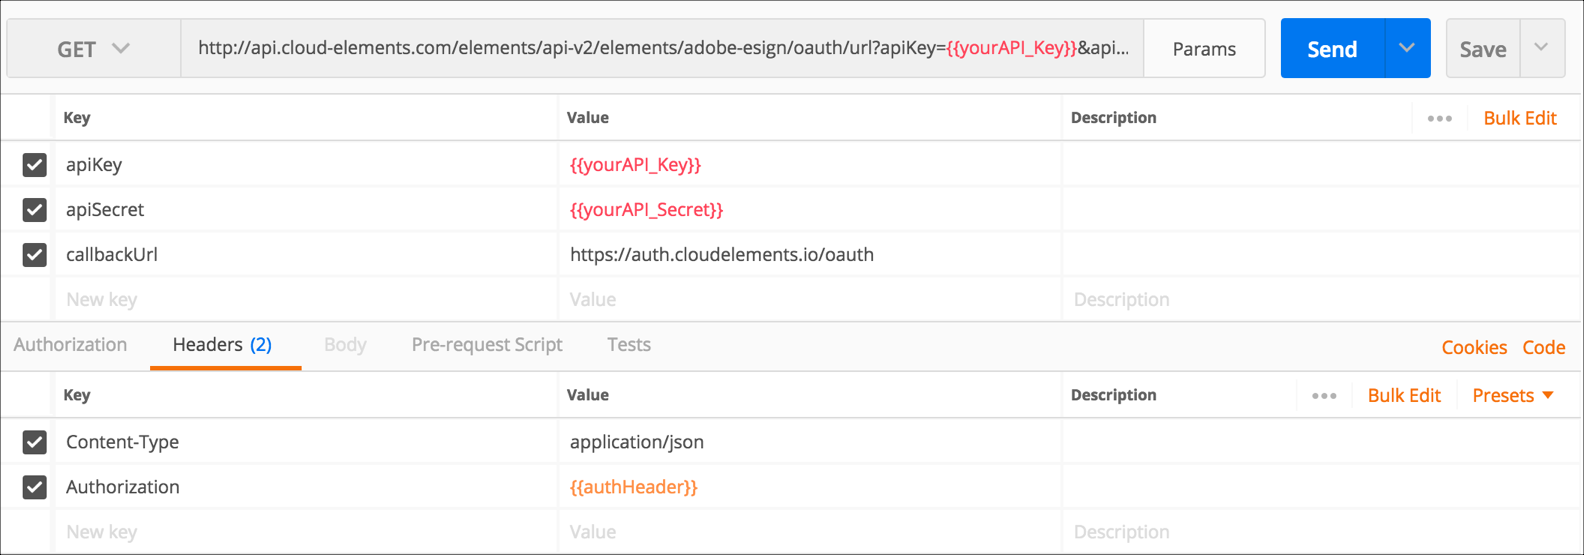
- Enter the resulting OAuth URL into a browser, authenticate with the API provider, and intercept the oauth provider code that is returned.
- Make a call to
PATCH /instanceswith the full Authorization header and theproviderData.codevalue.

- Confirm that the user is successfully re-authenticated, and that API calls can be made successfully against the Cloud Elements 2.0 instance.


When a recent phone number change is preventing a successful login within a Cloud Elements account due to 2FA option, it is good to know that the phone number reset is available through the API calls. In order to perform this action, you need the User Secret and Organization Secret related to the Cloud Elements account in question before following these steps:
1. A GET call to retrieve the account id:
  curl -X GET
  https://api.cloud-elements.com/elements/api-v2/accounts
  -H 'Authorization: User *******, Organization *******'
  -H 'accept: application/json'
2. A second GET call to retrieve all the available users related to that account id:
curl -X GET \
 https://api.cloud-elements.com/elements/api-v2/accounts/YourAccountID/users
  -H 'Authorization: User *******, Organization *******'
  -H 'accept: application/json'
3. Using the response body from the step 2 retrieve the user id related to the email address in question and perform the PATCH call to update the phone field:
curl -X PATCH \
  https://api.cloud-elements.com/elements/api-v2/accounts/YourAccountID/users/YourUserID
  -H 'Authorization: User *******, Organization *******'
  -H 'Content-Type: application/json'
  -H 'accept: application/json'
-d '{ "phone": "YourNewPhoneNumber" }'Note: Once all these steps have been performed and login to CE account the new phone number will be required to be confirmed.
Here is a sample video how all the API calls work.
To help prevent unnecessary reauthentication, Cloud Elements automatically refreshes OAuth tokens both on demand and on a regular nightly schedule. While rare, the vendor authentication endpoint can fail in some situations; for example:
- the vendor's service is down or inaccessible
- the user account is deactivated or invalid on the vendor's end
- there is an unrelated but affecting network/service issue
In the case of a network or service issue, Cloud Elements waits for ten seconds before retrying the authentication up to five times, which is generally successful. However, with vendor-side service access or account issues, we may keep retrying with every request made to the element instance.
In order to prevent further resource consumption and increased latency, authentication token refreshes will be locked after five failed attempts (with ten seconds between each attempt). If this occurs, the element instance will be automatically disabled and will need to be manually re-enabled and re-authenticated with the endpoint. If an element instance associated with your account is automatically disabled, you will receive an email notification.
