Cloud Elements supports events via polling or webhooks depending on the API provider. For more information about our Events framework, see Events Overview.
Supported Events and Resources
Cloud Elements supports webhook events for Acuity Scheduling. After receiving an event, Cloud Elements standardizes the payload and sends an event to the configured callback URL of your authenticated element instance. For more information about webhooks at Acuity Scheduling including the currently available webhooks, see Acuity Scheduling's webhooks documentation.
After you set up webhook events in Cloud Elements, you also need to configure webhooks at Acuity Scheduling with the Webhook URL provided after authentication. See Webhook Configuration.
Webhooks
You can configure webhooks through the UI or in the JSON body of the /instances API request .
Configure Webhooks Through the UI
To configure webhooks through the UI, follow the same steps to authenticate an element instance, and then turn on events. For more information, see Authenticate an Element Instance with Events (UI) or the element-specific authentication topic.
After successfully authenticating, open the authenticated instance that you just created, and then copy the Webhook URL. You'll use the url to configure webhooks at Acuity Scheduling.
Configure Webhooks Through API
Use the /instances endpoint to authenticate with Acuity Scheduling and create an element instance with webhooks enabled.
To authenticate an element instance with webhooks:
- Get an authorization grant code by completing the steps in Getting a redirect URL and Authenticating users and receiving the authorization grant code.
Construct a JSON body as shown below (see Parameters):
{
  "element": {
    "key": "acuityscheduling"
  },
  "providerData": {
    "code": "<AUTHORIZATION_GRANT_CODE>"
  },
  "configuration": {
    "oauth.api.key": "<Acuity Scheduling app Client ID>",
    "oauth.api.secret": "<Acuity Scheduling app Client Secret>",
    "oauth.callback.url": "<Acuity Scheduling app Redirect URI >",
    "event.notification.enabled": true,
    "event.notification.callback.url": "<CALLBACK_URL>"
  },
  "tags": [
    "<Add_Your_Tag>"
  ],
  "name": "<INSTANCE_NAME>"
}
Call the following, including the JSON body you constructed in the previous step:
POST /instancesNote: Make sure that you include the User and Organization keys in the header. For more information, see Authorization Headers, Organization Secret, and User Secret.Locate the
tokenandidin the response and save them for all future requests using the element instance.Set up [webhooks at the API provider][#webhook-configuration].
Example cURL
curl -X POST \
  https://api.cloud-elements.com/elements/api-v2/instances \
  -H 'authorization: User <USER_SECRET>, Organization <ORGANIZATION_SECRET>' \
  -H 'content-type: application/json' \
  -d '{
  "element": {
    "key": "acuityscheduling"
  },
  "providerData": {
    "code": "xoz8AFqScK2ngM04kSSM"
  },
  "configuration": {
    "oauth.api.key": "Rand0MAP1-key",
    "oauth.api.secret": "fak3AP1-s3Cr3t",
    "oauth.callback.url": "https://mycoolapp.com",
    "event.notification.enabled": true,
    "event.notification.callback.url": "https://mycoolapp.com/events"
  },
  "tags": [
    "Docs"
  ],
  "name": "API Instance"
}'
Parameters
API parameters not shown in the Cloud Elements are in code formatting.
| Parameter | Description | Data Type |
|---|---|---|
key | The element key. acuityscheduling | string |
code | The authorization grant code returned from the API provider in an OAuth 2.0 authentication workflow. Cloud Elements uses the code to retrieve the OAuth access and refresh tokens from the endpoint. | string |
Namename | The name of the element instance created during authentication. | Body |
oauth.api.key | The API key or client ID obtained from registering your app with the provider. This is the Client ID that you recorded in API Provider Setup. | string |
oauth.api.secret | The client secret obtained from registering your app with the API provider. This is the Client Secret that you recorded in API Provider Setup. | string |
oauth.callback.url | The URL that the API provider returns a user to after they authorize access. This is the Redirect URI that you recorded in API Provider Setup. | string |
Events Enabledevent.notification.enabled | Optional. Identifies that events are enabled for the element instance. Default: false. | boolean |
Event Notification Callback URLevent.notification.callback.url | The URL where you want Cloud Elements to send the events. | string |
| tags | Optional. User-defined tags to further identify the instance. | string |
Webhook Configuration
Use the Webhook URL we generated after you authenticated the element Instance to set up webhooks at Acuity Scheduling. Before you begin, review the Acuity Scheduling documentation on webhooks.
- Log in to your account at Acuity Scheduling.
- On the left, click Business Settings, and then click Integrations.
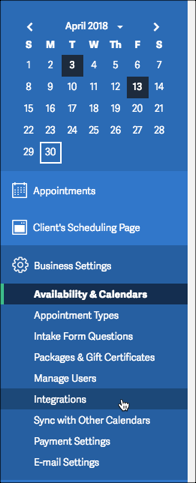
- Scroll to the API section, find Webhooks, and then click Set Up.
- In the new window, enter the Webhook URL from the authenticated element instance in any of the webhook types that u want to receive events for.
- Click Save Settings.

